🧰
- Welcome to CYF Workshops
- arrays
- asking-questions
- breakdown
- collective-job-hunting
- components-1
- components-2
- crud
- dad-joke
- db-backup
- debugging-2
- debugging-3
- debugging
- devtools
- dom merge conflict
- express setup
- get forms
- git-cli
- git day 1
- goblin breakdown
- instructional design
- interviewing
- js1-wk1-eval
- know your computer
- learning objectives
- LLM writing 1
- node challenge london-mini-guide
- objects
- Onboarding new volunteers
- paint the room
- pitch-camp
- playing-computer
- polish
- questions-and-reviews
- react-pokedex
- reporting-bugs
- sql-quiz
- stand-up
- technical writing one
- template
- testing
- time-string
- touch-typing
- triangles
- undefined
- wordle
🔗 Welcome to CYF Workshops
Learning Objectives
Welcome to CYF Workshops
This is a shared repository of workshops developed by CYF volunteers. All these workshops are open source and free to use. Workshops are group activities generally run on CYF class days, or sometimes in midweek sessions.
Some of these workshops are shown on the CYF curriculum site day plans. Others are used in other contexts. All are welcome!
How to contribute
Report issues by opening a ticket on this repo. If you are talking about a specific workshop, please include the name of the workshop in the title of the ticket and @mention the author of the workshop in the body of the ticket. There’s no guarantee the author is still around!
To contribute a workshop, open a pull request and label it [New Workshop]. There’s a template folder with some helpful notes.
Please only submit workshops you actually plan to use in a currently running cohort (or have run in a past CYF cohort).
Deployments
This repo has a micro front end that will render your workshops in the curriculum theme. Look through workshops and decide which to use with your cohort.

This entire repo is also deployed to Netlify under the name
cyf-workshop, so any index.html you upload to your folder will create a webpage you can use in your workshop.
For example:
https://github.com/CodeYourFuture/CYF-Workshops/tree/main/asking-questions deploys itself here: https://cyf-workshop.netlify.app/asking-questions/
Pull requests against this repo will automatically generate disposable branch previews and a bot will link these on the PR. This will work for trainees, if that is useful for your activity.
Magic
These workshops are pulled through to various front ends and displayed using the CYF Common Theme. Write for GitHub first, but you can secretly jazz up your layouts for those contexts by using Hugo shortcodes wrapped in HTML comments. You can add any shortcode in comments and it will be parsed and rendered on our curriculum sites, but not here.
Look in the source code
📝Note
We are working on uniting the views as much as we can. These features can be rendered in both places:
Notes
💡Tip
GitHub style notes will be rendered as notes on Common
Objectives
Objectives wrapped in a codeblock with the string objectives will be piped into the curriculum success pages
Diagrams
Mermaid works on Common, exactly the same, and any diagrams you write in a readme or issue will render there too. There’re flowcharts, sequence diagrams, gantt charts, mindmaps, and more.
Find more render hooks on Common.
🔗 arrays
Instructions
This workshop aims to check your understanding.
Each task will explain whether or not you should run the code.
For each task, you can use Data Groups Sprint 1 prep
to help you with the questions.
You can also use documentation to look up any functions that are unfamiliar.
Don’t use ChatGPT or any other AI tool to help you.
🧰 Setup
- Get into pairs or groups of up to three.
- Make sure you have a clone of the CYF-Workshops repository on your local machine
This workshop can be found here 👉 https://github.com/CodeYourFuture/CYF-Workshops/tree/main/arrays
In this workshop, each file contains a different problem at a particular level.
You should start this project at Level 100 and then move through the levels in ascending order, level 200, 300 etc.
🔗 asking-questions
Asking Questions 101
Prep
- Read this article about Mental Models
- Load this webpage, which stores the problems we will work on today. https://cyf-workshop.netlify.app/asking-questions
Today we’re going to start learning a formal language of developer questions. We will begin with this basic format:
- What I did
- What I expected
- What actually happened
This format helps to find the discrepancies between expectations and reality. (This is the gap in our understanding.)
It’s also an efficient way to share our current understanding with others.
Expectation vs reality
When we are surprised by an outcome it usually means we had a mental model of the world that didn’t predict the world accurately. Don’t panic when this happens, it’s completely expected for even experienced developers to run into surprises. We use these gaps as signs that we need to update our mental models.
To develop our understanding of coding, we will:
Predict & Explain
- Make a prediction by explaining what the outcome will be
- Play computer - “run” the model in our heads and predict (say before) what the outcome will be
Try
- Code up our idea
- Run the code
Compare and Update
- Compare the outcome with our prediction
- Explain the gap between our prediction and what actually happened
- Update our understanding
This process is cyclical.
Updating the right model
If you are stuck and can’t explain the gap in your mental model, then it’s time to ask a question!
When we ask questions, it’s important that we share our current mental model as part of your question so that other people can test the right thing, focus on the mis-understanding. Then together you can get quickly to a shared understanding of your specific problem.
Let’s look at how asking questions helps you update your mental model with an example.
🕹️Inversion, 5m
- Set a timer for 5 minutes.
- Popcorn around the room and each person give an example of a bad way to ask a question until the timer goes off. For example:
Argh I can’t make it work please help me!
Why are these not useful?
🕹️Inversion 2, 10m
- Set a timer for 10 minutes.
- Popcorn around the room and each person give a reason that one of the previous questions was bad until the timer goes off. For example:
What is it? What are you trying to do? In what way is it not working? Be specific! Share what you see. Do you have a link? What do you want it to do?
Exercise ground rules
Before we get to the next exercise, let’s just set some ground rules here:
- The goal is not to complete the exercise; the goal is to learn
- The smart thing to do is to focus on the questions you cannot (yet) answer
🕹️Framing questions systematically, 30m
Split into groups of 2-5 people.
Set a whole class timer for 30 minutes.
Confound yourselves
- Pick a problem from the bank.
- As a group, make a prediction about what you think the answer is, and write it down.
- Test your prediction. Try it out using the dev tools.
- Compare your prediction with the outcome.
What happened? Is there a gap in your understanding?
Keep doing this until you find a problem you can’t solve, then write up your mental model using this format:
- What I did
- What I expected. Make sure you include your prediction here
- What actually happened
Include as much context as you can, including links, line numbers, sample code, etc. Use code blocks to mark up your code. If you use screenshots, they should only show the visual render (never screenshot code - paste code as text).
Now post your write up of the question in #cyf-ask-tech-stuff.
🧑🏾💻🙋 Developer questions contain
- 🔗 Links 👍
- Objectives - what are you actually trying to do? 👍
- 🖼️ Screenshots of UI 👍
- 📝
Code blocks👍 - 📷
Screenshots of code🙅
📚 Further reading
🔗 breakdown
Break it down
Here is an app that helps users find a halfway point to meet up.
How does this work?
How would you build this in real life?
You have probably done lots of tutorials where you follow along and copy what the teacher shows you, and this does teach you some simple things about programming. But it doesn’t teach you how to solve your own problems or build your own products, and it doesn’t help you when things go wrong. To understand how to develop really new things, you have to practice thinking up your own solutions and trying (and failing a lot).
So let’s start today by “reverse engineering” an existing app together.
Start by identifying the core functionality of this app. Forget about the web page, or the fonts, or the name… what does this thing REALLY DO? What is the simplest version of that function you can build and test.
Split into groups of 4-6. Choose one of the group to wear the User Hat. If in doubt, blocked, or making an assumption, ask the User what to do.
User Stories
🕹️Spike on User Stories, 10m
- Set a timer for 10 minutes.
- Define a User Story:
“As a user, I want to do x so that I can y.”
Perhaps you said something like...
- As a user, I want to draw a line and cut it in half.
- As a user, I want to find the midpoint between me and my friend so we can meet for lunch.
- As a user, I want to enter two different locations and receive information about the geographic midpoint between them.
Put all your user stories together and vote on the best one. Now let’s spike on Acceptance Criteria.
Acceptance Criteria
🕹️Spike on Acceptance Criteria, 10m
Set a timer for 10 minutes.
Define Acceptance Criteria (Given/When/Then):
Given some scenario, when I do something, then I expect some outcome.
Perhaps you said something like...
- Given that I have two distinct geographical locations,
- When I input these locations into the application,
- Then I should be provided with the geographic midpoint between the two locations.
Put all your acceptance criteria together and vote on the best one. Now we understand it more clearly, let’s spike on a test for this feature.
Test
🕹️Spike on Test, 15m
- Set a timer for 15 minutes.
- Define a test: - What is the simplest test you can write to prove that your acceptance criteria is met? - What is the simplest code you can write to pass that test?
Perhaps you said something like...
const calculateMidpoint = require("./calculateMidpoint");

test("calculateMidpoint calculates the correct midpoint", () => {
  expect(calculateMidpoint(51.5074, 0.1278, 48.8566, 2.3522)).toEqual({
    lat: 50.182,
    lon: 1.24,
  });
});
This test defines two locations, London and Paris, and expects the midpoint between them to be calculated to three decimal places.
You might not have chosen to use longitude and latitude at all, so your test might look different. That’s ok! The important thing is that you have a test for the acceptance criteria you defined.
Now that we have a test, we can write the simplest code to pass that test.
Code
🕹️Spike on Code, 15m
- Set a timer for 15 minutes.
- Write the simplest code to pass your test.
Perhaps you said something like...
function calculateMidpoint(lat1, lon1, lat2, lon2) {
  // Compute average latitude and longitude
  const mid_lat = (lat1 + lat2) / 2;
  const mid_lon = (lon1 + lon2) / 2;

  return {
    lat: parseFloat(mid_lat.toFixed(3)),
    lon: parseFloat(mid_lon.toFixed(2)),
  };
}

module.exports = calculateMidpoint;
This code takes two locations, calculates the average latitude and longitude, and returns the midpoint between them, more or less. It’s more complicated to calculate the midpoint between two points on a sphere accurately.
So we have discovered something we need to ask our user about:
how accurate do you need this to be?
Remember we are writing the simplest thing that can possibly work. For now, we’ll use this rough calculation.
OK that’s a spike! We have a test and some code that passes that test. We can go forward and build this app for the rest of the day if we like. But first, let’s do it again with a different product.
Practice makes permanent
Go to the CYF Product Factory and get a random product. Break it down into user stories, acceptance criteria, tests, and code.
- Discover the core functionality of the product.
- Write a user story for that functionality.
- Write acceptance criteria for that user story.
- Write a test for that acceptance criteria.
- Write code to pass that test.
🔗 collective-job-hunting
Learning Objectives
Collective Job Hunting 💼
Our goal in this workshop is to look for jobs together as a community. By working together, we can motivate and support each other in our collective goal of finding new jobs in tech. In this workshop, we will focus on the following objectives:
Set up ⚙️
- Split up into groups of no more than 5
Job hunting 🔍
- Set a whole class timer for 25 mins ⏱️
- Split the group up into teams of no more than 5 people
- Find the Collective Job Research form.
- Each team should select no more than 3 different platforms to use based on the first tab of the Collective Job Research form. Each team should use a different set of platforms than the other team.
- Search for jobs using appropriate keywords and filters.
- Identify a suitable job role that you want to apply for.
- Find the job opening advertised on the company website if possible.
- Identify key company information in the job advert.
- Add the link and information about the vacancy to the Collective Job Research spreadsheet.
🔗 components-1
Learning Objectives
First Components
Today we’re going to think about components. We’re going to build a page using a design system and we’re going to collaborate on a feature branch workflow.
The overall mission is to compose “components” / groupings of HTML elements to re-build this web page: CYF Components Workshop.
Requirements
Before you start, make sure you’ve installed the CYF Extension Pack in VS Code.
🕹️Set up your feature branch 15m
Set up your feature branches
Divide the class into three teams: header, footer, card. Use the team generator to help you do this.
Set a whole class timer for 10 minutes.
Each team, choose a driver
- Driver, clone this repository
- Driver, create and checkout a new branch for your team named like this:
feature/cohort-component, where cohort is your cohort name and component is the component you’re building, for example:feature/nw6-header
git switch --create feature/cohort-component
Now you’re all set up to make changes to together.html.
🕹️Find your docs 10m
Find your docs
Set a whole class timer for 10 minutes.
Deployed from this repo is a mini design system. This design system has several documented components: card, header, and footer. Each component view has some sample code and some statements about the components.
Your mission is to find the docs for your component and read them.
Together separately
Set a whole class timer for 30 minutes.
🕹️Parallel Development 30m
Now build your component. Elect a new driver.
- Find together.html in the /components-1 directory. Your mission is to complete this page.
- In the correct portion of the page, make your changes to build your feature on together.html.
- Driver, commit your changes to your feature branch.
- Open a pull request from your branch to main, with your changes.
- Remember, docs will help you.
- Do the simplest thing that could possibly work to begin with. You can always update your PR with more changes.
Review and merge
Now we’re going to review each other’s work. If a mentor is available, they can be the driver for this part and you can actually merge your PRs. If not, please don’t try to merge as you could make a mess of this shared repo.
Note to mentor: please revert together.html to the initial commit after you’re done so the next class can use it. (Or if your group has time for it, you can merge on a fork instead.)
Set a whole class timer for 30 minutes.
🕹️Review 30m
- Go to the pull requests for this repo.
- Either individually or as a group, review each other’s PRs.
- Once you’re all happy with the PR, merge it.
- Did it work? Why/why not? Discuss.
Acceptance Criteria
- We have worked in three teams to build a page using a design system
- We have used a feature branch workflow to collaborate
- We have reviewed each team’s PR
🔗 components-2
Learning Objectives
Components are Functions
Today we’re going to think some more about components. We’re going to build a page using a design system and we’re going to collaborate on a sub branch, feature branch workflow. We’re going to identify the difference between HTML and the DOM using Devtools. And we’re going to create new DOM nodes using JavaScript functions. Oh my goodness, it’s so many things! That’s why it’s best to do this workshop after you’ve done a couple of modules of https://programming.codeyourfuture.io/
And in particular, these workshops:
If you missed these workshops in your cohort, it’s a good idea to try to do them in the week (online) first. Record your session for people that can’t attend. Everyone should try to do the workshops first, either in groups or solo if necessary.
The overall mission is to compose “components” / groupings of HTML elements to build a page in together.html.
But this time, we’re going to use JavaScript functions to build our components.
🕹️Set up your working branch 15m
Set up your working branch
Everyone should do this so everyone is set up correctly.
- You will be working on a special branch called FOR-USE-IN-CLASS.
- First, clone the workshops repository
Checkoutgit switch FOR-USE-IN-CLASS - Your cohort has a named sub branch. Everyone, check that out next with
git switch --create COHORT(egNW6). This is your working branch.
Check you are in the right place with GitLens!
Visualise this Git workflow
💡Your working branch is your cohort name
Get set up to work in teams
Next, divide the class into four teams: header, footer, card, menu. Use the team generator to help you do this.
Set a whole class timer for 10 minutes.
🕹️Set up your branch 10m
Each team, choose a driver
- Driver, ask everyone in your team to confirm you are in the right working branch.
- Driver, from this branch, create and checkout a new branch for your team named like this:
feature/cohort-component, where cohort is your cohort name and component is the component you’re building, for example:feature/nw6-header
git switch --create feature/cohort-component
Now you’re all set up to make changes to together.html.
Find your docs
Set a whole class timer for 10 minutes.
🕹️Find your docs 10m
Deployed from this repo is a mini design system. This design system has several documented components, and some also have JavaScript files.
Your mission is to find the docs for each component with an associated script file, and read them. Discuss your findings. Here are some things to consider:
Look at the pages on the website with Devtools. Compare the Inspect view with the source code you can see in the files. How are they different? How are HTML and the DOM different?
What is a module? What does this code do <script type="module">import Header from "./docs/header/header.js";</script> ?
Together separately
Set a whole class timer for 30 minutes.
🕹️Parallel Development 30m
Now build your component. Elect a new driver.
- Find together.html in the /components-2 directory. Your mission is to complete this page.
- In the correct portion of the page, make your changes to build your feature on together.html.
- Driver, commit your changes to your feature branch.
- Open a pull request from your branch to the COHORT branch, with your changes. Ask for help!
- Remember, docs will help you too.
- Do the simplest thing that could possibly work to begin with. You can always update your PR with more changes.
Review and merge
Now we’re going to review each other’s work and merge to our cohort branch.
Your COHORT branch is your cohort name. You’re working in your COHORT branch and not in main. Open your pull request to your COHORT branch.
⚠️Your working branch is your cohort name
Visualise this Git workflow
Set a whole class timer for 20 minutes.
🕹️Review 20m
- Go to the pull requests for this repo.
- Either individually or as a group, review each other’s PRs.
- Once you’re all happy with the PR, merge it.
- Did it work? Why/why not? What does “work” mean for this workshop? Discuss.
Acceptance Criteria
- We have worked in teams to build a page using JavaScript components and modules
- We have used an advanced sub-branch feature branch workflow to collaborate
- We have reviewed each team’s PR
🔗 crud
Learning Objectives
CRUD 101
Requirements
Today we will build a CRUD API. CRUD stands for Create, Retrieve,* U*pdate, Delete. If you think about it, this is what most applications do:
Create some “resources”
Retrieve them (GET them)
Update them
Delete them
🎯 Workshop Objective
Our API will manage Beyoncé albums. It will:
Create a new album,
Retrieve a list of albums or a single album,
Update an existing album’s information
Delete an album
We will build these endpoints:
GET /albums should return all the albumsGET /albums/:albumId should return a single album (that matches the passed albumId)POST /albums should save a new albumDELETE /albums/:albumId should delete the album (that matches the passed albumId)
1. GET /albums should return all the albums
In server.js, create a GET /albums endpoint that returns all the albums. Some albums have been provided for you in albums.json.
app.get("/albums", (req, res) => {
  res.send(albumsData);
});
🧪 Run and test
npm run dev- Open Postman
- Make a GET request to
http://localhost:3000/albums
2. GET /albums/:albumId should return a single album (that matches the passed albumId)
Sometimes, we do not want to list all the information in one request, maybe we only want to get the information related to a single album. Imagine if we have a page to display the details of one album. We could call the server and get all albums then filter the one we need client-side. It would be more effective to tell the server to just return the one album we are interested in.
We will now add a new endpoint to return only a single album GET /albums/:albumId. In this case, albumId will tell us what album we can return. The call will be GET /albums/10 and that will return the album with that has albumId: "10".
This endpoint has something different. The endpoint /albums/:albumId has a dynamic part. The albumId will vary depending on what the client sends.
In server.js, create a GET /albums/:albumId endpoint that returns a single album. The albumId will be passed as a parameter in the URL.
app.get("/albums/:albumId", (req, res) => {
  const albumId = req.params.albumId;
 // now find the given album from the `albumsData` using the `albumId`
 // finally send the album you found back to the client
});
🧪 Run and test
- Save your changes
- Make a GET request to
http://localhost:3000/albums/10 - Try changing the id in the URL and calling the endpoint again. What do you see?
3. POST /albums should save a new album
In order for our server-side to receive and use the data sent by the client, we will need to install and use a middleware.
The JSON middleware makes it easy for our route handlers to read JSON data from the request. If the Content-Type request header indicates that the request body contains JSON data then the middleware calls JSON.parse to convert the request body into a JavaScript data structure.
To register the JSON middleware, add the following to the server code:
app.use(express.json()); // before our routes definition
In server.js, create a POST /albums endpoint that saves a new album. The album will be passed as a JSON object in the request body.
Step by step if you get stuck
- Add the following code to
server.js:
app.post("/albums", function (req, res) {
  const newAlbum = req.body;
  albumsData.push(newAlbum);
  res.send("Album added successfully!");
});
- Open Postman and create a new request.
- Set the Request Type to POST.
- Enter the URL for your endpoint, which should be http://localhost:3000/albums.
- Set the Body Type to raw and format to JSON (application/json).
- Enter the Album Data in the body of the request as JSON:
{
  "albumId": "13",
  "artistName": "Beyoncé",
  "collectionName": "B'Day (Deluxe Edition)",
  "artworkUrl100": "http://is5.mzstatic.com/image/thumb/Music/v4/6c/fc/6a/6cfc6a13-0633-f96b-9d72-cf56774beb4b/source/100x100bb.jpg",
  "releaseDate": "2007-05-29T07:00:00Z",
  "primaryGenreName": "Pop",
  "url": "https://www.youtube.com/embed/RQ9BWndKEgs?rel=0&controls=0&showinfo=0"
}
- Click Send.
- You should see the album you just created in the response.
4. DELETE /albums/:albumId should delete the album (that matches the passed albumId)
This means that DELETE /albums/2 should delete an album with the id 2 and return 200 with JSON { success: true } to the user.
The code will look like this
// notice .delete
app.delete("/albums/:albumID", function (req, res) {
  console.log("DELETE /albums route");
});
Can you work out how to remove an album using this code?
Acceptance Criteria
- I have written a server that can handle the following requests:
- GET /albums
- GET /albums/:albumId
- POST /albums
- DELETE /albums/:albumId
- I have used Postman to test my server
Resources
🔗 dad-joke
Joke Fetcher App
This simple app fetches jokes from an API and displays them. Here are some ways we could improve it:
Acceptance criteria
- Given a Joke API
When the page first loads
Then a random joke will be displayed on the page
- Given a joke has already been fetched and displayed
When the user clicks the “Get New Joke” button
Then a new random joke will be fetched and replace the existing one
- Given there is a slow network
When the page first loads
Then a loading message will be displayed…
🐛 Debug
❗ Commit after completing each task ❗
- Separate code into separate files - HTML, JS, CSS
- Fix functionality for acceptance criterion 1 only
Navigator:
- Describe out loud the current behaviour in the user interface
- Describe what you should expect to see given the acceptance criterion
- Step through the code to make sense of where the bug is coming from
- Fix functionality for acceptance criterion 2 only
Navigator:
- Describe out loud the current behaviour in the user interface
- Describe what you should expect to see given the acceptance criterion
- Step through the code to make sense of where the bug is coming from
- Check all acceptance criteria are working ( including 3 )
Refactor 🧹
- Refactor
getJokesto use async/await
Challenge 💪
- Try implementing a loading spinner using CSS
🔗 db-backup
Learning Objectives
Development environment and database Workshop ⚙️
This workshop will guide you through the following:
- setting up your development environment
- initialising a local database
- removing, re-initializing, and most importantly, backing up your database for the Full Stack Product.
Requirements
- Check you’ve split into a team for the Full Stack Project
- Clone your team’s fork of the Full Stack Project Assessment repository to your local machine.
- Locate the User story: Video recommendation listing issue on the Project Kanban board
- From the User story: Video recommendation listing issue, locate the Setup your local development environment and Setup your local database issues
- Have a code editor or terminal ready.
Part 1 - Set up your local development environment
- Set a whole class timer for 10 mins ⏱️
- Follow the instructions in the setup guide to set up your local development environment
- Check the acceptance criteria on the Setup your local development environment issue. Has everyone in your team met the acceptance criteria for this issue?
Part 2 - Set up your local database
- Set a whole class timer for 15 mins ⏱️
- Use the instructions for the db setup guide to set up a local database with one table and some data. Use the first section in the instructions to complete this task.
- Check the acceptance criteria on the Setup your local database issue. Which criteria have you met?
Part 3 - Backup your local database
- Set a whole class timer for 15 mins ⏱️
- Use the instructions for the db setup guide to backup your local database
- Check the acceptance criteria on the Setup your local database issue. Which criteria have you met?
Part 4 - Remove, Re-store, and Restoring
- Set a whole class timer for 15 mins ⏱️
- Use the instructions for the db setup guide to backup your local database
- Check the acceptance criteria on the Setup your local database issue. Which criteria have you met?
Practice Makes Perfect
Set another timer and repeat the dropping, re-initializing, and restoring process a few more times to solidify your understanding. Experiment with different backup file locations if you’d like.
By the end of this workshop, you should feel confident in creating, removing, re-initializing, and backing up your database so you don’t need to worry about losing your data.
Acceptance Criteria
Double-check the acceptance criteria on the issues: Setup your local development environment and Setup your local database
By completing these steps, you’ve mastered the fundamentals of database setup for the Full Stack Assessment, and you’re ready to tackle the next challenge!
🔗 debugging-2
Debugging workshop - 2
Please follow the steps below:
- The class should split up into seperate groups / breakout rooms.
- Each team should check debug_checklist.md file first and discuss which other strategies they would consider for debugging codes.
- Instructors will pick up one of the team’s checklist and do a demo for levels 100 and 200 in front of the whole group.
- Trainees go back to their breakout rooms and debug level 300 in their teams.
🔗 debugging-3
Debugging Part 3: React Components
Install
In the project directory, you can run:
npm install
Start
In the project directory, you can run:
npm start
Tasks
In the folder features you will find a bunch of files that relate to the functionality of the different components. For each of the features you
must read the scenario and fix/implement the required behavior
Goal
The goal here is to focus on fixing one small part functionality at a time. Trainees should:
- fix one scenario
- test it works
- commit the changes
🔗 debugging
Debugging is Asking Questions
Prep
- Re-read this article about Mental Models
- Watch this video about VSCode Debugger and follow along with the mini-workshop
- Open this CYF Workshops repo in VSCode and go to the
debugging/bankfolder to find the problem bank.
Whew, that’s loads! But we did set it all as coursework, so you have done it already, right? 😉
Today we’re going to use our formal language of developer questions. We began with this basic format:
- What I did
- What I expected
- What actually happened
This format helps to find the discrepancies between expectations and reality. (This is the gap in our understanding.)
It really helps us with debugging. Today we will use a debugger and our scientific method to find and fix bugs. Recall your scientific method:
Recap asking questions
Predict & Explain
- Make a prediction by explaining what the outcome will be
Test
- Run the code to see what actually happens
Compare and Update
- Compare the outcome with our prediction
- Explain the gap between our prediction and what actually happened
- Update our understanding
This process is cyclical.
Setup
Get into pairs. Each pair consists of two roles:
- Computer: Execute the code mentally, predicting the outcome.
- Debugger: Use the VSCode debugger to step through the code.
You will swap roles after each exercise.
Set a whole class timer for 10 minutes.

Stepping
🕹️Understanding Variables and Flow, 10m
Identify the value of variables at each step in a loop.
const sumArray = (numbers) => {
  let total = 0;
  for (let i = 0; i < numbers.length; i++) {
    total += numbers[i];
  }
  return total;
};
console.log(sumArray([1, 2, 3]));
Computer:
- Write down predictions for
totalandivalues before each loop iteration. - Compare predictions after each Debugger’s step.
Debugger:
- Open
sumArray.jsin VSCode. - Choose ‘Run > Start Debugging’ from the menu.
- Set a breakpoint at
total += numbers[i];. - Step into your function.
- Step Over through iteration until your loop is complete.
- Monitor
totalandiin the Variables section.
Debugging
Okay, swap roles. Set a whole class timer for 15 minutes.
🕹️Finding an Error, 15m
const findLargest = (numbers) => {
  let largest = numbers[0];
  for (let i = 1; i < numbers.length; i++) {
    if (numbers[i] > largest) {
      largest = numbers[i];
    }
  }
  return largest;
};
console.log(findLargest([3, 7, 2, 5, 6]));
Debugger:
- Open
findLargestin VSCode. - Predict the return value of
findLargest. Write your prediction down. - Set a breakpoint at
if (numbers[i] > largest). - Debug and inspect
i,numbers[i], andlargest. - Write down the return value of
findLargest([3, 7, 2, 5, 6]).
Computer:
- Predict the value of
largestafter each loop iteration. - ‘Execute’ the code and write down the actual value of
largestafter each loop iteration. - Write down the return value of
findLargest([3, 7, 2, 5, 6]). - Now execute the code in VSCode. Did you get the same result?
Both (briefly) write up your mental model using this format:
- What I did
- What I expected. Make sure you include your prediction here
- What actually happened
Okay, swap roles. If you have time left and you’re into this, there are many problems stored in debugging/bank. Set a whole class timer for 15 minutes.
🕹️Problem Bank, 30m
Pick any problem from the bank and work through it together. Use the debugger and the scientific method to find and fix the bug.
Write up your findings in the developer question format. Swap roles and repeat until we run out of time.
🧑🏾💻🙋 Developer questions contain
- 🔗 Links 👍
- Objectives - what are you actually trying to do? 👍
- 🖼️ Screenshots of UI 👍
- 📝
Code blocks👍 - 📷
Screenshots of code🙅
📚 Further reading
🔗 devtools
Learning Objectives
Inspector Gadget
Prep
For this workshop you will need:
- Chrome with Devtools
- A ChatGPT account
- This Devtools Workshop page
- Someone to keep track of the timer for each activity
You’ve already used a little bit of Devtools in ITD when you used Lighthouse to audit your code. But there’s much much more! Devtools is an entire IDE (Integrated Development Environment) running inside your browser and it has hundreds of ways to inspect, test, and develop your code.
💡Explore
Inspect the DOM
✍️Explore
In groups of no more than five.
Take it in turns to swap the driver for each section of this workshop
Inspect the page with Devtools.
Write down the answers to these questions:
- What is the name of the font used on the page?
- What is the CSS variable that holds this value? (Hint: variables start with
--, like,--paper) - What is the brand colour value (Hint: it’s set in a variable)?
- What is the brand colour value used for in the page?
- What variables hold CSS length data type values?
When the timer goes off, share your answers with the other groups. Paste them in a thread in Slack and go quickly to the next challenge.
So we’ve seen that fonts, colors, and spacing are often stored as CSS Variables, or custom properties. This allows them to be easily changed throughout a project by simply altering one value. Let’s experiment with this.
✍️Experiment
- Set a whole class timer for 10 minutes.
- Inspect the CSS of the page with Devtools.
- Find the CSS Variables (hint: variables start with
--, for example,--paper) - Try changing the values of these variables and see how it affects the page.
- Some questions to answer. (Make a prediction about what you think will happen first, and then test it)
- What will happen when you click the value of
--fingerand pressup arrowten times? - What will happen when you delete the value of
--copy - What will happen when you change the value of
--spacetored?
Reflection
When the timer goes off, set a new timer for 10 minutes to share your answers with the other groups.
Grid Inspector
Next, let’s see how the page layout is handled. Modern websites use the CSS Grid for layout and you can manipulate grids with Devtools.
✍️Grid Editor
- Set a whole class timer for 10 minutes.
- With Devtools, locate a grid element on the workshop page.
- Activate the Grid Badge in the Elements panel.
- Use the Grid Editor to try changing the layout.
- Go straight to the next challenge!
Lighthouse
It’s important that software works and that people can use it. Lighthouse can help you write code correctly by pointing out your errors. But even better, it can teach you to fix the errors.
✍️Audit
- Set a whole class timer for 10 minutes.
- Run a Lighthouse audit on the workshop page.
- Look at the results and identify the issue.
- Now, how will you fix it? Click on the error. Lighthouse explains what is wrong and provides a link to a detailed explanation on why it’s wrong, how serious it is, and how to fix it!
- If you have time, fix the error, but in any case, once the timer goes off, paste the link to the detailed explanation page into the workshop thread in Slack.
- Go straight to the next challenge, after which we will spend some time discussing what we discovered.
Hover for more
In fact Devtools is a great teacher. In the Styles panel, hover over any CSS property to get a quick definition of that property. Click ‘Learn More’ to go straight to the MDN page for that property.
If the explanation doesn’t make sense to you, ask ChatGPT (a generative AI) to explain it further.
⚠️Plausible Hallucinations
Remember: Generative AIs are regularly confidently wrong; it can be helpful, but never trust it over Devtools.
If something doesn’t make sense, or seems confusing or maybe wrong, it’s better to ask friendly humans in Slack.
✍️Explore and Explain
- Set a timer for 10 minutes.
- Select
<main>in the Elements panel - Hover over the ruleset attached to main in the Styles panel.
- Copy the Devtools explanation and ask ChatGPT to explain it, like this:
Please explain this to me like I'm a beginner learning HTML and CSS.
Determine a grid item’s size and location within the grid by contributing a line, a span, or nothing (automatic) to its grid placement. Shorthand for ‘grid-row-start’, ‘grid-column-start’, ‘grid-row-end’, and ‘grid-column-end’.
- Come back together as a large group.
Reflect
✍️Reflect
- Set a timer for 5 minutes.
- Spend five minutes discussing what you will share with the rest of the class about your experiments so far. What was a surprise to you? What will you use regularly from now on? What confused you? Elect one person to represent your group.
- Set a timer for 20 minutes.
- Popcorn round the representatives and share your findings. We’re not done yet so keep to time.
Many ways of examining the same thing
So we’ve explored the Elements panel, the Styles panel, and the Lighthouse panel. There are many many more panels, and they all expose a different way of interpreting, interacting with, or understanding the same code. Computer systems frequently do this. It’s a mistake to think that the way you use a website is the only way it can be used. Bots, crawlers, screenreaders, integrations…there are many and various consumers of your code, so it’s important to make sure you construct it properly.
For example, you have just looked in the Elements panel. This is not really your HTML, this is the DOM, an API the browser builds using your HTML. An example of how the DOM is different from HTML is that JavaScript can change what’s in the page - this changes the DOM, but doesn’t change the actual HTML. The DOM isn’t the only API it builds. Let’s look at another one right now!
✍️A New Lens
- Set a timer for 5 minutes.
- Find the Accessibility Panel and check ‘Enable full-page accessibility tree’
- Now click the “Universal Man” button in the Elements Panel.
- What is Ignored in the Accessibility Tree that is present in the DOM?
- When the timer goes off, share your answer with the other groups by pasting in the workshop thread.
Reflect
✍️Develop Your Skills
- Set a timer for 10 minutes.
- Discuss how your team will work on developing your skill with Devtools. Make your goals SMART. For example, you might audit a website you have built already with Lighthouse and improve its score using the guides. You might schedule a study group where each person researches and then teaches the group about a different panel in Devtools.
- Write down your learning goals with Devtools on a piece of paper and sign it underneath. Elect a new person to represent your group.
- Set a timer for 10 minutes.
- Popcorn round the representatives and share your commitments.
And that’s it for today! We have covered a lot, but remember, as developers, we are lifelong learners. Always be curious and don’t be afraid to explore new tools and concepts. Soon we’ll dive even deeper into Devtools, so make sure to keep exploring.
More
Inspect web pages as you use the internet. Do this all the time! What font does Youtube use? What about CSS Tricks? Hackernews is still using tables - what’s wrong with this?
Try changing the style and content of some websites. Make your favourite website bright pink. Make the BBC News page tell people about something great you did. Send a screenshot of something cool you changed to your cohort’s Slack channel.
There are crash courses in Devtools all over YouTube and Udemy etc. Find a useful tip and share it in your class channel.
🔗 dom merge conflict
DOM Merge Conflicts
This workshop contains a collection of DOM components. For this workshop, you will be creating branches for refactoring and updating the components and then resolving the merge conflicts that arise. You’ll be working in pairs, learning how to handle branching, refactoring, and creating pull requests.
Overview
Objective: Learn to resolve merge conflicts that arise during software development
Activity: Update and refactor DOM components in two different Git branches
Duration: 1 hour
Describe how merge conflicts can occur in a development setting
Interpret a merge conflict message
Resolve a merge conflict while preserving changes to the code
Prerequisites
- JS DOM syntax
- Access to documentation
- Some knowledge of how to run tests using Jest
Setup
- Get into pairs
- Before starting, ensure you create a fork of this repository on Github to use as a pair. Each person in the pair must clone down the fork of this repository from Github and navigate to the project directory
Instructions
1. Start Branching from main
Each pair will need to branch off from main. Firstly, make sure you both start on the main branch and it’s up to date:
git switch main
git pull origin main
2. Choose a task
As a pair, choose one task from tasks that you will both follow.
3. Follow the task instructions until the end
Choose who will be Person 1 and who will be Person 2 and then follow the instructions in your task’s directory.
Once finished, continue the instructions on this page.
Some tasks will ask you to unskip tests, remove the skip before from the appropriate describe block in this case.
4. Test your changes
Use the provided test suite to ensure your app works correctly. Run the tests according to the task’s testing instructions.
5. Raise a pull request
Once you have tested your changes and are satisfied with the changes, commit your changes and push your branch to the remote repository:
git add <files-you-changed>
git commit -m "<description of change>"
git push origin [your-branch-name]
You should raise a pull request on your pair’s fork of this repository.
6. Handling merge conflicts
Once you have both raised your pull requests, choose one Pull Request to review first and then merge it.
Now you will need to handle the second pull request. For this pull request, you should now have a merge conflict in the remaining pull request.
On the branch to be merged run:
git pull origin main
So that you can resolve the changes locally using Git.
Use this guide from GitHub to resolve the conflict using Git.
When you come to resolve the merge conflict, you need to make sure to keep the updates and refactors. Make sure to test that your app still works.
Once you’ve resolved the conflict, you should be ready to merge the second PR. Discuss with your partner whether the tasks assigned have been completed after both merges.
🔗 express setup
Learning Objectives
Express Workshop
This workshop is based on the Node Girls Express Workshop
Fork the express-workshop repository
git clone https://github.com/YOUR-USERNAME/express-workshop
git clone https://github.com/YOUR-USERNAME/express-workshop
Requirements
Step 1 - Setting up your project
When creating a Node.js project, you will usually install many different packages along the way. To share your project with others, you need to list those packages, so others can install the same set of packages.
In Node.js, this ’list’ file is called a package.json. The ’things you’ve installed’ are called dependencies. Your dependencies come in little packages, each one labelled and numbered by your Node Package Manager, npm. They are the software your software depends upon to work.
Creating this file is the first step in setting up your project.
1. Make a package.json file
Let’s start by creating the package.json file. We can add things to it as the project grows. The package.json file is easy to create from the command line.
Type the following command into your terminal:
npm init
This command will initialise a step-by-step process for creating thepackage.json. You should see something like this:
-> % npm init
This utility will walk you through creating a package.json file.
It only covers the most common items, and tries to guess sensible defaults.

See `npm help init` for definitive documentation on these fields
and exactly what they do.

Use `npm install <pkg>` afterwards to install a package and
save it as a dependency in the package.json file.

Press ^C at any time to quit.
package name: (express-setup)
It will ask you a bunch of questions.
You can skip most of the questions but change the
entry pointfrom(index.js)toserver.js.
The wizard asks you for the following information:
name,version,description,main,test,repository,keywords,author,license-
do you understand all of them?
At the end of the wizard, you should see a new file called package.json in your project’s folder.
Here is an example package.json file for a project called
Passport.
What is JSON?
JSON is a type of file for structuring data in a readable way. It is also a really popular format for sending data across the web. JSON is a string representation of a Javascript object. JSON objects convert really easily to Javascript objects, and vice versa, with JSON.parse() and JSON.stringify().
{
  "firstName": "John",
  "lastName": "Smith",
  "isAlive": true,
  "age": 25,
  "address": {
    "streetAddress": "21 2nd Street",
    "city": "New York",
    "state": "NY",
    "postalCode": "10021-3100"
  },
  "phoneNumbers": [
    {
      "type": "home",
      "number": "212 555-1234"
    },
    {
      "type": "office",
      "number": "646 555-4567"
    },
    {
      "type": "mobile",
      "number": "123 456-7890"
    }
  ],
  "children": [],
  "spouse": null
}
Step 2 - Installing Express
Today we are going to install Express. Node and Express are not the same thing. Express is not a mandatory step of setting up a Node project or a package.json. It’s just a piece of software we will use a lot.
Before we write any code, you’ll need to install the Express library. We’re going to use the Node Package Manager (npm) to download it using the npm install command.
NPM is the place to go to download other Node code written by other people. There are thousands of open-source, 3rd-party Node modules (also known as “packages”) by other people that you can download and use in your own projects.
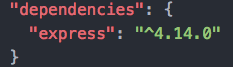
As we install Express, we’ll need to update the package.json to add Express as a dependency. We do this so that other people working on the project will know to install Express before running any of the code. Do this by adding--save to the end of your command.
Run the following command in your terminal:
npm install express --save
Express should now be installed. Check your package.json file to make sure it has been added as a dependency. It will look like this:
Step 3 - Building the server
The first step is to build our server. You will always need to build a server when writing back-end code. A server can be built with in-built Node.js libraries, but Express gives us simpler syntax to work with.
1. Create a server.js file
Let’s build our server! Before we do anything, let’s create a new file called server.js. This is where all our server code is going to live.
2. require the express library
We already installed Express in Step 2, but we need to make sure it is included in this file specifically so we can make use of its methods. In Node.js, when you want to access the functionality of a library or module in another file, you require it. This is like import, which you have already used many times. require is an older syntax; Express is old software.
To import Express, write the following inside server.js:
const express = require("express");
3. Initialise the server
To initialise our server, we need to call the express() function. This will create an Express application for us to work with.
Add the second line of code to your server.js file:
const express = require("express");
const app = express();
4. Start ’listening’ for potential requests
One more step left, we need to set a port for our server to listen to. Think of a port as a door number; any requests that come to the server will come via that door. Setting a port will allow us to find where our server is running.
We use the app.listen method to do this. This method takes two arguments: a port and a callback function telling it what to do once the server is running. Need clarification? Read more about the app.listen method in the Express documentation.
We’re going to run our server on port 3000, and run a console.log as our callback function. Update your server.js file, calling the app.listen method:
const express = require("express");
const app = express();

app.listen(3000, () => {
  console.log("Server is listening on port 3000. Ready to accept requests!");
});
5. Switch the server on!
You’ve built your server, but it isn’t running yet. We need to run a command in the terminal to do this. We are going to use the node keyword to run the server file.
Type the following command in your terminal:
node server.js
If you see this, congratulations! You have built a server!

Step 4 - Communicating with the server
Now that we’ve built the server, we need to communicate with it. We’re going to control the server with handler functions.
What is a handler function?
When a request reaches the server, we need a way of responding to it. In comes the handler function. The handler function is just a function which receives requests and handles them, hence the name.
The handler function always takes a request and response object, and sends the response back to the client along with some information. You can decide what to send back in your response.
What does a handler function look like in Express?
The get() method is used to define a handler function in Express. It takes two parameters: the endpoint at which to trigger an action (we’ll explain more about this in the next step), and the handler function that tells it exactly what to do. Here’s a simple “Hello World!” example:
// req is the Request object, res is the Response object
// (these are just variable names, they can be anything but it's a convention to call them req and res)
app.get("/", (req, res) => {
  res.send("Hello World!");
});
Here, we are telling our server to respond with “Hello World!” when someone
tries to access the webpage.
1. Create your own handler function.
We are now making a handler function with a custom message in our response. You can write any message you want.
Update your server.js file with an empty app.get() function:
const express = require("express");
const app = express();

app.get("/", (req, res) => {});

app.listen(3000, () => {
  console.log("Server is listening on port 3000. Ready to accept requests!");
});
Exercise: Try to
console.logtherequestobject inside the handler function. Restart your server, refresh the browser, then go to your terminal to see what it looks like. You should see a lot of data come through.
2. Tell your handler function what to do
We want our handler function to send back a message to the client. To do that, we’re going to use the Express send()
method. This will update the response object with the message.
Update your handler function like so:
const express = require("express");
const app = express();

app.get("/", (req, res) => {
  res.send("Yay Node Girls!");
});

app.listen(3000, () => {
  console.log("Server is listening on port 3000. Ready to accept requests!");
});
3. Check it out in your browser
Quit your server in the terminal with ctrl + c. Then restart it to run your new changes.
node server.js
Now, open Chrome and navigate to http://localhost:3000. If you see your message in the browser, congratulations! You just sent your first response from the server.
Step 5 - Routing
At the moment our server only does one thing. When it receives a request from the / endpoint, it sends back the same response: “Yay Node Girls!”.
Try typing http://localhost:3000/nodegirls and see what happens.
However by making use of endpoints, we can make the server send different responses for different requests. This concept is called routing.
What is an endpoint?
An endpoint is the part of the URL which comes after /. For example:/chocolate is the “chocolate” endpoint. It’s the URL to which you send a request.
What is a URL?
1. Create your own endpoints and send different responses
We’re going to try sending different responses at different endpoints. Remember the app.get() method? To set up routing in your server, we need to repeat this method with different endpoints.
For example:
app.get("/", (req, res) => {
  res.send("Hello World!");
});

app.get("/chocolate", (req, res) => {
  res.send("Mm chocolate :O");
});
Exercise: Add some code so that your server sends one message when the endpoint is
/nodeand another one when it’s/girls.
Step 6 - Serving static files
So we know how to send back a simple message. But what if you want to send back a whole HTML page, or an image?
Things like HTML files, images etc are called static assets. If you want your server to “serve” static assets back to the browser, you need to do something different than just using the res.send() method.
To be able to send any file from the server we need a special, built-in
middleware function that comes with Express: express.static(). Read more about it in the Express JS docs.
Say we want to serve all the static assets in our “public” folder. Theexpress.static() function will look like this:
app.use(express.static("public"));
1. Serve static files from your server
Delete all your app.get endpoint functions, and replace them with the line of code above. Restart your server, refresh your browser and see what happens! If you see a Node Girls CMS, then your static assets have been successfully served.
HTTP request methods
All requests use one of the HTTP methods. The main ones are: GET, POST, PUT, DELETE.
app.get deals with requests that use the GET HTTP method.
We will go into these Methods into more details, but for now:
GETis a method for GETting dataPOSTis for POSTing/inserting new dataPUTis for updating existing dataDELETEis for deleting data
The POST http request method
When sending data to the server, we use the POST http request method, instead
of GET.
Let’s try POSTing some text to the server.
We’re going to add a form to the index.html page, so that you can write your blog posts from there.
Open up the index.html file in your text editor. If you have a look, you should see this:
<div class="entry-container">
  PASTE YOUR CODE HERE!!
</div>
Replace the greyed-out comment with this code snippet:
<h3>Create a blog post</h3>
<form action="/create-post" method="POST">
  <textarea name="blogpost" rows="10" cols="14"></textarea>
  <button type="submit">Send</button>
</form>
- This form has a text area and a send button.
- The
actionattribute is the endpoint form data will be sent to. - The
nameattribute will be used later to reference the data.
When you hit send, the form will send a POST request to the server. The form will use whatever is in the action attribute as the endpoint (destination). In our case it’s /create-post.
Exercise: Open Chrome Developers tool, click the button and see what happens.
Receiving the blog post on the server
- Data doesn’t come through the server in one go; it flows to the server in a stream. Think of a stream as water flowing from a tap into a bucket. Your job is to collect this water in the server.
If we were writing a pure Node server, we would have to think about how to collect the stream of data properly. But luckily for us, Express handles all of that stuff.
All you need to do is define a route to deal with requests that come through on the /create-post endpoint.
Let’s remind ourselves of a GET route in Express:
app.get("/hello-world", (req, res) => {
  res.send("Hello there!");
});
Exercise: This time we want to define a route to deal with a
POSTrequest not aGET. What do you think you would need to do differently?
Experiment and see if you can define a route for the /create-post endpoint!
For now, make your /create-post handler simply do this: console.log('I am /create-post endpoint').
Extracting the blog post
Now the contents of your blogpost is hidden in your req object somewhere. Normally you would extract it using req.body. Try to console.log req.body now.
Getting undefined? Not to worry, that’s normal. When data has been POSTed to the server as FormData, we need to do things slightly differently to access the data that’s come through in the request.
We need another middleware function. Something that can get extract the contents out of the special FormData object. For this we will use express-formidable. express-formidable is another Express middleware. It will extract the form data from the request and make it available to you when you do req.fields.
This time though, express-formidable is not built-in, we need to install it.
In your terminal, install express-formidable
npm install express-formidable --save
require express-formidable so you can use it in your code. You can’t use dashes in JavaScript variable names, so call it const formidable.
const formidable = require("express-formidable");
Now add this towards the top of your server, after your requires andapp.use(express.static('public')), but before your /create-post endpoint:
app.use(formidable());
Now inside your /create-post function, add:
console.log(req.fields);
Refresh your server and have another go at writing a blog post.
You should now see an object in the console. The key should be blogpost, just like the name attribute in the form on the HTML page. The value of blogpost will be your message!
Exercise: Try putting
app.use(formidable());at the end of the file
(after thecreate-postbut before starting the server)
What is a middleware in Express? Middleware functions are functions that have access to the request object (req), the response object (res), and the next function in the application’s request-response cycle. The next function is a function in the Express router which, when invoked, executes the middleware succeeding the current middleware. Read more on writing middleware in the Express documentation
Step 8 - Saving your blog post
Right now, your precious blog posts aren’t being saved anywhere, which is a bit of a shame. Let’s do something about that.
You’ll note that in the data folder there’s a new file called posts.json.
If you look at posts.json will see there’s already one blog post there. The format is:
{
    [timestamp]: [blog post message]
}
We’ve used a timestamp as the key so that the blog posts are listed in
chronological order. Also, it’s a record of when the blog post was created.
Writing to your hard drive
Anytime a blog post comes through to the server, we want to save the data on your computer’s hard drive. To do this, we need to use a built-in Node module: fs, which stands for ‘file-system’.
Built-in Node modules - core Node modules - are rather like the built-in Express middleware functions. Only difference is that where you need to have installed Express to use Express middleware functions, the core Node modules come automatically with Node itself.
To use fs, require it at the top of your server file:
const fs = require("fs").promises;
The method we need to write to your hard drive is fs.writeFile.
fs.writeFile("path/to/file", yourData)
  .then(() => {
    console.log("successfully written to the file");
  })
  // do something
});
- Argument 1:
"path/to/file"the location of the file you want to write to - Argument 2:
yourDatathe data you want to write
The ‘path/to/file’ will be replaced with the actual path to the file you want to write to. If it doesn’t exist, fs.writeFile cleverly creates one for you. But we already have posts.json, so not to worry.
Reading from your hard drive
To read data that’s already there, you would use fs.readFile. The way to use fs.readFile is very similar to fs.writeFile:
fs.readFile("path/to/file")
  .then(file => {
    console.log(file);
  })
  // do something
});
- Argument 1: the location of the file you want to read from
Let’s read the data from the posts.json file. Make sure you’ve required the fs core Node module at the top of your server file somewhere.
Add this code to your server (put it anywhere after the requires for now):
fs.readFile(__dirname + "/data/posts.json")
  .then(file => {
    console.log(file);
  })
  console.log(file);
});
(__dirname is a Node global object that gives you a path to your current working directory. It’s handy to avoid writing the whole path out in full.)
If you restart the server, you’ll probably see something like this:
<Buffer 7b 0a 20 20 20 20 22 31 34 36 37 33 39 30 33 35 36 32 39 31 22 3a 20 22 54 68 69 73 20 69 73 20 6d 79 20 76 65 72 79 20 66 69 72 73 74 20 62 6c 6f 67 ... >
This is actually the contents of your posts.json file, but in a format called a buffer. To make it a bit more human-readable,console.log the file to a string, like this:
console.log(file.toString());
file is in JSON format right now. To access the blog post message inside file, we need to parse it from JSON back to a JavaScipt object.
Add this next bit of code to the .then callback for fs.readFile’s:
const parsedFile = JSON.parse(file);
Now parsedFile is a normal JavaScript object, and we can access the data inside it.
Ok, so we’ve talked about JSON and we’ve talked about reading and writing files. You now have the power to save new blog post data to your hard drive! Work with your partner and your mentor to see if you can figure the next steps out on your own.
Here’s a breakdown of what you want to achieve:
- When new blog post data comes through, read from
posts.jsonto access its contents - Add your new blog post data to the old ones.
- Write your new combined data back to the
posts.jsonfile.
Things to remember
fs.writeFile()normally overwrites the target file you’ve given it. Chances are you don’t want to lose all your old blog posts every time you get a new one, so think about how you can combinefs.readFile()andfs.writeFile()to prevent overwriting.You will need to convert between JSON and a JavaScript object several times.
JSON.parse()andJSON.stringify()are what you need.
Oh by the way, if you want to get the current timestamp, use the JavaScript Date.now() method.
Step 9 - Displaying your blog posts
So now we’re saving the blog posts to the server, it’s time to display them in the browser!
Look inside public/script.js. There’s a whole bunch of JavaScript code in there. Don’t worry about what all the code means, just know that it’s responsible for sending a request to GET old blog posts and display them on the page underneath “Recent Posts”.
script.js is trying to load existing posts by making a GET request. Look inside script.js and see if you can find any useful endpoints.
Your script.js file will want to receive the JSON containing your blog posts. Your job is to make that happen!
Express has a handy method called res.sendFile() that makes it easy to send files back to the client. Feel free to use this with your JSON.
If all goes well, you should have a fully functional CMS!
Stretch
For a really good workout, redo this workshop using
- Node and Next.js
- Deno and Oak
Acceptance Criteria
- I have created an Express server
🔗 get forms
Learning Objectives
Get Forms
This workshop is about writing forms in HTML.
Note: this workshop is deployed to Netlify at https://cyf-workshop.netlify.app/get-forms and branch previews are turned on. Any PRs opened to main will be deployed automatically and can be looked at via the bot link on that PR.
Requirements
Before you start, make sure you’ve done your prep work on forms and worked through some of the examples in the HTML forms section of MDN.
Today we’re going to build a form that interacts with GitHub Search. It’s a bit unusual for a form as we are writing a GET method, where the form requests, or gets data, instead of a POST method, which sends data.
Next, we’re going to swap our forms with another group and test the form we made.
Last, we’re going to make changes based on the test feedback. Because it’s important that software works and that people can use it.
But first, everybody needs to be ready to participate.
🧰 1. Setup
🕹️Getting Set Up
- Set a timer for 10 minutes.
- Fork this repository to your own GitHub account.
- Clone the repository to your machine.
- Checkout a new branch called
cohort/your-name. - Open get-forms/index.html in VS Code.
📖 GitHub Search Project Briefing:
Create a form so the user can search GitHub repositories based on specific criteria.
👤 User Stories:
- As a user, I want to search on GitHub.
- As a user, I want to sort my results by stars, forks, or when last updated.
- As a user, I want to sort my search results in my preferred order, ascending or descending.
✅ Acceptance Criteria:
US1: Search Field
Given I am on the GitHub search form,
When I select the search field,
Then I should be able to type in my search query.
US2: Sorting Results
Given I am on the GitHub search form,
When I choose from options of stars, forks, and updated.
Then the results are sorted by stars, forks, or last updated.
US3: Options for Sort Order
Given I am on the GitHub search form,
When I choose a sort order
Then the results should be sorted in my preferred order, ascending or descending.
Overall Acceptance Criteria
Given I am on the GitHub search form,
When I run Lighthouse
Then the Accessibility score is 100.
2. 🧱 Build the form
🕹️Get results from GitHub
- Set a timer for 45 minutes.
- Work in pairs.
- Read the project briefing carefully.
- Look in the resources section for help with the elements you might need.
- Write your HTML in
get-forms/index.html. Do as much as you can, leaving time to open your PR (10 or 15 minutes). - Open a pull request to this repo with your work. Your PR will show up in the list of PRs for this repo and a deploy preview will be created and linked on your PR. Explore this.
3. 🧪 Test the form
🕹️Test the form
- Set a timer for 15 minutes.
- Swap your form with another group by choosing the PR directly above yours in the PR list. If you are at the top of the list, choose the PR at the bottom of your group!
- Test your colleague’s form against the acceptance criteria.
- Comment on their pull request with what you have found.
4. 🫠 Review and respond
🕹️Review the test results
- Set a timer for 15 minutes.
- Read the comments on your pull request.
- Make changes you need to make to your form to pass the acceptance criteria.
- Commit and push your changes to your branch; your pull request will update automatically.
- If your pair doesn’t have changes, join a team that does and help them.
Resources
🔗 git-cli
Learning Objectives
💡 Purpose
Currently, you’re using the 🎮 VSCode interface to interact with Git.
However, we can often use different interfaces to carry out the same tasks.
In this workshop, you will use the Git CLI - Command Line Interface to interact with Git.
In addition, you will:
- Consolidate existing knowledge of Git
- Develop your mental model of the working tree and the staging area
- Learn to use basic Git CLI commands
During this session, with the Git CLI, you will:
🧰 Setup
Work in pairs:
- Assign one person to be driver (the driver will control the keyboard and do the typing)
- Assign another person to be navigator (the navigator will read out the questions and explain how to tackle the problems).
The driver must ensure they have a clone of this repo on their local machine.
📜 Instructions
Follow the link to the readmes for further instructions:
Head to the Starting point for more instructions
🔗 git day 1
Learning Objectives
Git Day 1
Git is a tool for software development that you will likely come to rely on in your software development journey. It might seem complex at first but with continuous practice, you will begin to disentangle the complexity.
💡 Objective
This workshop will deepen your understanding of Git. By the end of this workshop, participants will:
- Navigate a GitHub repository using the VSCode interface
- Fork and clone a repository, create branches, and commit changes using the VSCode interface
- Articulate the difference between a fork and clone
- Explain their mental model of the working tree and the staging area
Setup
- Break out into groups of 5/6 ( depending on volunteer and trainee numbers )
- Use these instructions as a guide to check your understanding, resolve misconceptions and develop your understanding
This workshop starts with a recap based on this week’s prep material…
Exploring GitHub repositories
Recap activity 🕹️
- Trainees do this section in pairs
- ⏲️ 10 mins
Let’s recap some of the things from earlier in the week.
Visit the following repository on GitHub: https://github.com/CodeYourFuture/cyf-demo-repo
Answer the following questions:
a) How many commits are there in the cyf-demo-repo project?
b) Who committed on Oct 31, 2020?
c) What changes did illictonion make in the commit titled “Revert changes accidentally pushed in the past”?
d) How many files were added in the first commit? What were the names of the files?
e) What is the hash for the first commit in the history?
f) What is Claire Bickley’s favourite food?
🧵🗣️ group discussion
- Group discussion
- ⏲️ 10 mins
- A volunteer will need to facilitate this section
A volunteer can facilitate this group discussion by going through the questions above and asking pairs for their feedback. If pairs are unsure / not quite accurate then spend a small amount of time addressing misconceptions.
Remember to ask around for feedback.
Creating a fork 🍴
🕹️ Recap activity
- Trainees do this section in pairs
- ⏲️ 5 mins
Use the guidelines from the prep section of this week to create a fork.
- On one person’s computer, fork this repo: https://github.com/CodeYourFuture/cyf-demo-repo
- 📝 Double-check the URL of your forked repo. How can you tell the fork was successfully created?
Group discussion/demo 🧵 🗣️
- Groups discussion
- ⏲️ 5 mins
- A volunteer will need to facilitate this section
A volunteer will need to navigate and let the group guide them in creating a fork.
🌀 Cloning a repository
🕹️ Recap activity
- Trainees do this section in pairs
- ⏲️ 5 mins
📋 Check your understanding
Before continuing, try answering the following:
❓ what is the difference between a fork and a clone.
Remember to check your answer before continuing.
- Clone your fork of
cyf-demo-repoto your local machine. - Open this local repository using VSCode.
- Use
pwdin your terminal to check you’re in the right place.
Group discussion/demo 🧵 🗣️
- Group discussion/demo
- ⏲️ 5 mins
- A volunteer will need to facilitate this section
A volunteer will need to navigate and let the group guide them in following through the steps in the previous recap activity.
🌳 Creating a branch
🕹️ Recap activity
- Trainees do this section in pairs
- ⏲️ 10 mins
Next, create a local branch called week-1-workshop
Group discussion/demo 🧵 🗣️
- Group discussion/demo
- ⏲️ 10 mins
- A volunteer will need to facilitate this section
Take a break for 10 mins… 🍫
Part 2 - New skills 🧰 - Committing and pushing 📸
🕹️ Activity - Figure it out 🔍
🎯 Goal: Make some local changes and create a local commit on our branch.
- Do this section in pairs
- ⏲️ 15 mins
Follow these instructions carefully.
Our Git timeline starts with some commits like this:
We’re going to figure out how to
- make local changes and commit them to our branch “week-1-workshop”,
so our history looks something like this:
where the most recent commits contain our changes.
To create a commit, we can use the following steps (explained more below):
- Make a change to a file
- View the local changes
- Stage the changes
- Creating the commit
🗄️ 1. Make a change to a file
- Open up your local repo
cyf-demo-repoin VSCode. - Go to the Explorer section of VSCode ( look for a 🔍 icon ).
- Find
file.txtand edit the file with the answer to the questions. - Remember to save the changes to
file.txt.
Tip:
- You can use Cmd + S on a Mac to save changes to a file in VSCode.
- You can use Ctrl + S on a Linux OS to save changes to a file in VSCode.
🔬 2. View the local changes
We want to view the changes we’ve just made to our working directory.
- Locate the Source Control tab in VSCode.

- Go to the Changes section and click on the file you changed - this should now show the changes for the file.
- Try editing the file again in the Explorer tab and check to see the update is visible in the Source Control panel
🟢 3. Stage the changes
We need to tell Git which changes we want to be part of our next commit.
Each commit is a checkpoint we’ve decided to save. When making a commit, we can decide to not include all of our changes in the checkpoint, but just include some of them.
We choose which changes we want to include in a commit by staging our changes.
In the Source Control tab again…
- Go to the file
file.txtand click on the +.
👓 Notice what happens when you carry out step 1.
- View the Staged Changes area in your Source Control panel.
📸 4. Create the commit
Once we’ve staged our changes, then we can commit these changes.
Before we do, we should make sure we’re on the correct branch. Check that you’re on the week-1-workshop branch.
Your VSCode window should look like this:
and not like this:
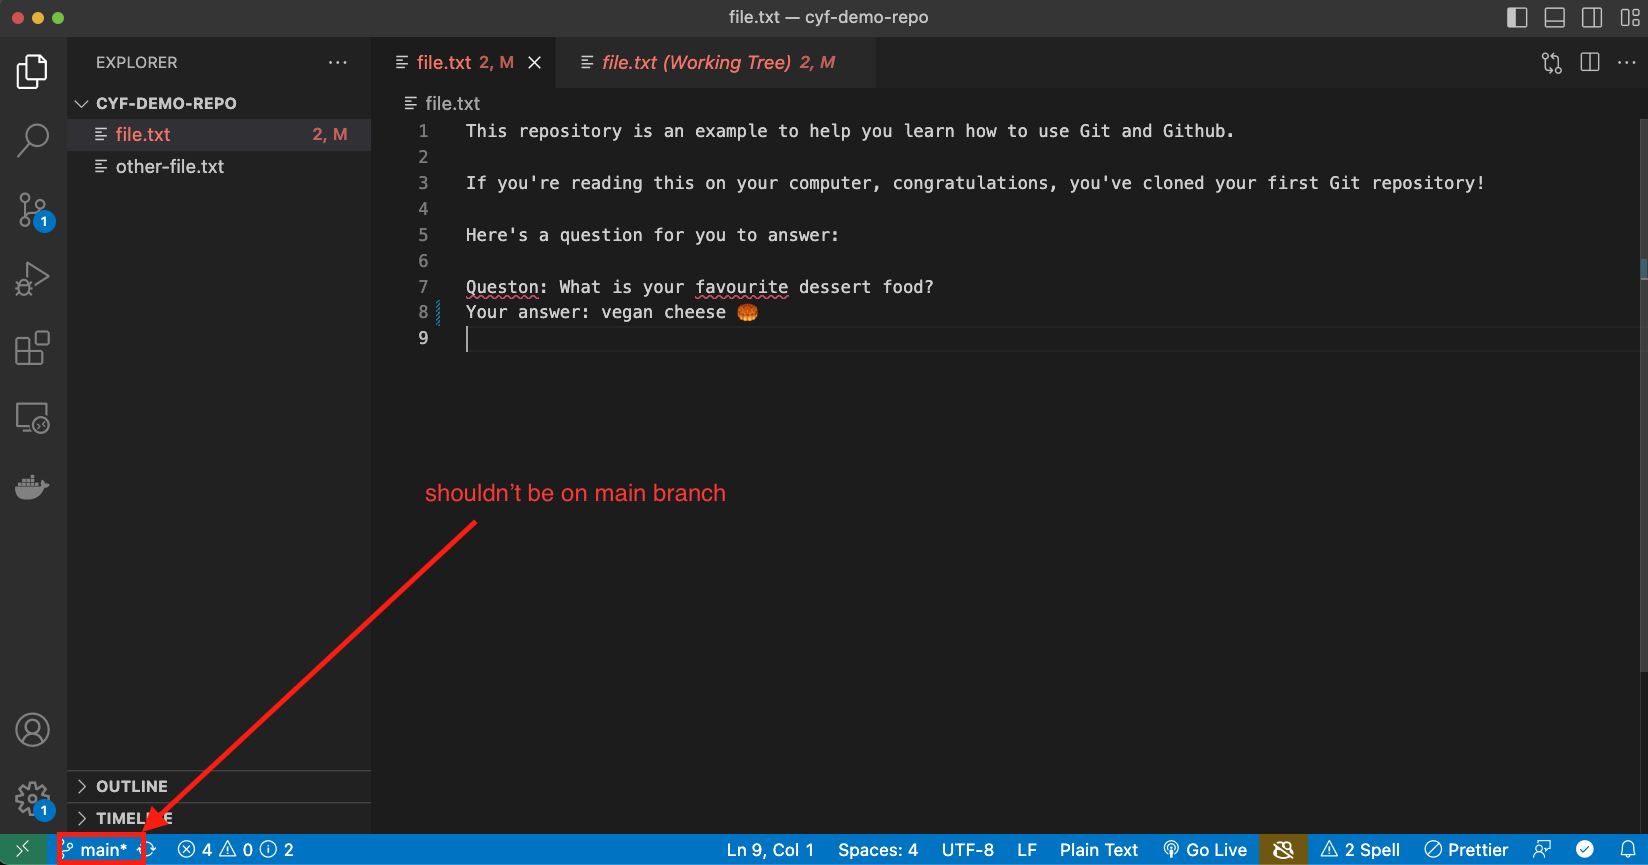
If you’re sure you’re on the right branch:
- Enter a commit message describing briefly what you did in your commit.
- Click Commit to create the Git commit.
📝 Now figure out how many commits you have on your local machine.
🧠 Explain what you think would have happened if you didn’t stage anything in your working directory when you made your commit.
When you’re finished…
❗ Once you’ve completed this commit, swap roles in your pair.
Choose another file and then go through the steps in the Creating a commit section
Group discussion/demo 🧵 🗣️
- Group discussion/demo
- ⏲️ 10 mins
- A volunteer will need to facilitate this section
A volunteer will now need to navigate with directions from the group. Go through the git commit steps together.
Also use this time for clarifying questions.
🫸 Pushing
🎯 Goal: Push a branch to a remote repository
🕹️ Activity - Figure it out 🔍
- Trainees work in pairs
- ⏲️ 5 mins
After committing your work on your machine, you’ll have a local branch that looks like this
📋 Double-check you’ve been committing to your branch week-1-workshop branch and not your main branch.
However, our remote fork only has a main branch:
In other words, we have not added our local branch onto the remote fork on GitHub.
To do this, we must push our branch onto GitHub.
push means adding local work to a remote GitHub repository.
🔍 Figure out how to push your local branch to the GitHub repository using the Source Control interface in VSCode.
🔍 Figure out how to check the week-1-workshop branch is on the remote fork.
Group discussion
- Group discussion/demo
- ⏲️ 5 mins
- A volunteer will need to facilitate this section
A volunteer will need to navigate and let the group guide them in following through the steps in the previous recap activity.
🧵 Tying things up
Now is some time to wrap up and discuss some of the key concepts from this week.
🗣️ Discussion in pairs
- Trainees discuss in pairs
- ⏲️ 10 mins
In your pair, discuss the following questions/tasks:
- What is a commit? Explain why we need to make commits when we’re developing a project.
- Explain why we store repositories on GitHub.
- Describe the purpose of VSCode.
- Explain the difference between Git and GitHub.
- Explain why developers use branches.
- Explain the difference between a fork and a clone.
- What does the branch name
origin/mainmean instead of justmain? - Check out the following git repository diagram below:
How many commits are in common between week-1-feature and main?
🗣️ Group discussion
- Discuss the questions together as a group. Go round and get feedback from each person in the group.
🔗 goblin breakdown
Learning Objectives
Goblin Breakdown
Use AI to break down coding problems into smaller pieces.
💡Prompt
Requirements
We’re practising breaking down our problems again. It must be Saturday!
This time we’re going to use AI to help us. Goblin is a small, clever integration with ChatGPT that makes magic todo lists. We’re going to use it to break down our problem and plan our solution.
🧰 1. Setup
You should already be set up but just in case, you need to open the Goblin workshop in VS Code. Set a whole class timer for 5 minutes.
🕹️Getting Set Up
- Fork the CYF-Workshops repo to your own GitHub account if you have not already.
- Clone the repository to your machine.
- Open in VS Code and go to the
goblin-breakdownfolder. - Look at the
contactfolder. It contains a file calledindex.js. This is where you will write your code. Look atdata.jsonto see an example of the data returned from the API.
👣 2. Break down coding problems
Let’s try breaking down a coding problem. Let’s do a sample problem together. Set a whole class timer for 10 minutes.
🕹️Planning a Solution 10m
Format a UK address and UK phone number from a JSON object and show it as HTML on the page
- Paste the above problem into Goblin and press the 🪄 wand button.
- Goblin will give you some steps. In the
contactfolder, paste each of the steps intoindex.jsas comments. There are some samples given but your Goblin might be a bit different. Feel free to delete the existing examples. - You likely have around five steps. Under each comment, write the name of the function you will write to achieve the step. Two are given as an example. Don’t write the function out, just the name and leave the function empty.
- Now you have planned your code! If you have time, start writing the functions.
💡Sample Solution
contact folder for the file completed.js.🧠 3. How can you use this?
Set a whole class timer for 10 minutes.
🕹️Reflect and Discuss 10m
Reflect on this process of breaking down the problem and planning your solution. Discuss with your pair or group.
- How can you use this process in your own work?
- What are the benefits of breaking down a problem?
- What are the risks of having an AI break down a problem? How can you mitigate those risks?
- What are the benefits of planning your solution?
- Why does CYF want to make you write such small functions?
- How could doing these steps make writing your code easier?
Acceptance Criteria
- I have used AI to produce a step-by-step plan for my solution
- I have written comments to structure my code
- I have produced a planned solution to a coding problem
- I have reflected on this process and discussed it with my pair or group
🔗 instructional design
Learning Objectives
🧑🏫 Instructional design at CYF
What is a well designed piece of coursework? How do we identify if study materials are well or poorly designed? How do we revise coursework tasks to make them more effective?
There are six key instructional techniques with reasonably sound evidence behind them.
We’re going to identify these foundational strategies in existing materials. Then we’re going to identify some ways to bring them into our own material.
- “Dual coding” or pairing graphics with words
- Concrete examples
- Elaboration or probing questions
- Interleaving solved problems
- Spaced repetition
- Retrieval through quizzing
In other words:
**Teaching isn’t telling, it’s guiding. **
🧑🎓 Activity
- Read Annotating texts - OCR - GCSE English Language Revision - OCR - BBC Bitesize
- Annotate this text. Circle these specific strategies
- Concrete example of where this useful
- Worked example / solved example
- Dual coding
- Retrieval through quizzing
🧑🎓 Activity
It’s common for people to begin creating course materials as a sequenced “todo” list. Do this, then that. But this doesn’t guide the learner effectively towards understanding. We must move from “do this” to “Do what? Why, and how?”
Here is a random piece of coursework: https://github.com/CodeYourFuture/Course-Fundamentals/issues/23
Copied here for posterity
Coursework content
Write 1 paragraph of your personal story/statement
Estimated time in hours
1
What is the purpose of this assignment?
- Write a 1 paragraph statement - between 50 and 100 words. Think about skills you have that can be used in your future job in tech, and mention them in this text.
- Check grammar using Grammarly. You should not have more than 3 mistakes.
- Add your statement to the “Personal Statement” thread on the Cohort Slack channel. If the thread hasn’t been created yet, please do it.
How to submit
Add the link to your post on Slack on this coursework
Add a screenshot of your post on this coursework
Anything else?
This video explains how to search in Slack
This is a formal writing task. We assign lots of these as they are essential! These putting ideas in tasks have the same repeated pattern:
- What is the FORMAT?
- What are the GOALS?
And leads to a subsequent metacognitive activity: getting ideas out
How do we test that our writing achieves our goals?
Let’s revise this. Write your revised assignment in the worksheet below.
💡Key Tips
- 🎯Start with the motivation: why is this useful to me?
- ✅Give an example solution: what does success look like?
- 🍱Create an analysing, categorising, summarising, illustrating, or explaining activity
- 📌Set the initial task (3 and 4 can be in either order)
- 🧪Make it testable. How will the learner assess their understanding?
✏️Worksheet:
Write a Personal Statement Task Revision
✅ Worksheet worked example
Personal statement
🧩 What is the FORMAT?
- 1 paragraph
- No personal pronouns
- 50 to 150 words
- At the top of a CV straight after your name and contact information
Career changer with ten years solid experience in original field, but latterly caught the coding bug. Spent the last two years working on software development obsessively. Build real products as a volunteer in small teams every week. Building with TypeScript, React, Node, Deno, Rust, GraphQL - just name it. Automating the deployment of containerised applications to AWS just for fun. Linked portfolio is stuffed with original, inventive, useful passion projects. Excited to learn more. More more more!
🎯 What are the GOALS?
A great personal statement grabs you from the first line. The point is to make you, particularly you, stand out from the hundreds of people your reader is sifting through. This is your best chance to clearly connect your specific personal achievements with some of the skills listed on the job description in a short, clear, paragraph. Your reader comes away thinking “I want to interview this one!” An effective personal statement is confident, distinctive, and shares just enough to make you want to read the rest of the CV.
🧪 And how do we TEST?
Make a game
My suggestions: We are building confidence and expression here. We don’t need to grade these attempts, we need to stage opportunities for the learner to evaluate effective and ineffective texts, including but not limited to their own.
🪡 Energiser: Haystack
Take the names off everyone’s personal statement and mix them up (and add in some AI generated ones). Now try to match the statement to the person. The person who is the most easily identifiable wins.
⏲️ Energiser: Play recruiter
Give everyone a job description and a big stack of CVs. Set a timer for 5 minutes. You must shortlist to three candidates. If your candidates are the “best match”, you win!
💡 Energiser: Buzz off!
(Sorting words is a familiar strategy for identifying categories. Categorising is a key learning activity. It helps us organise and structure our understanding.)
- First exercise: sort the words into two groups: expressive and obscuring / straightforward and jargon etc
Dynamic, use, passionate, software engineer, show, care, build, team player, utilize, make, showcase, work together, leverage, detail-oriented, dedication, developer
Example solution
buzzwords
Dynamic, passionate, team player, utilize, showcase, leverage, detail-oriented, dedication
expressive words
use, software engineer, show, care, build, make, work together, developer
- Second exercise, now you have identified them, highlight the buzzwords
“As a dynamic and passionate junior developer, I am an enthusiastic team player dedicated to utilizing my detail-oriented approach to showcase my skills. With an unwavering dedication to leveraging cutting-edge technologies, I strive to bring innovative solutions to the table. My commitment to excellence allows me to leverage my expertise, showcasing a unique ability to tackle complex challenges with meticulous attention to detail. I am eager to leverage my passion for programming and dedication to continuous learning, making me a valuable asset to any dynamic team environment.”
- Third exercise: collectively revise this statement to reduce the number of buzzwords.
🔗 interviewing
Interviewing [Professional Development] [60 minutes] 🧑💻
Acing job interviews is a skill that can be learned like any other. Today we will pair up to practice interviewing.
Objective 💬
At the end of this workshop, participants can:
- [] Introduce themselves in 2 minutes
- [] Answer soft skill interview questions using the STAR method
- [] Prepare a strategy to get ready for technical interviews
Setup 🌼
- Pair up into groups of 2-3
Stage 1: Introduce Yourself, 15 minutes 🙆
In almost every interview, the interviewer will ask you to introduce yourself. The goal is to give the interviewer a snapshot of who you are, your professional background, and why you’re a good fit for the role. Take 5 mins to craft a compelling narrative.
Some tips:
- Your response should be 1-2 minutes
- Try to structure your response, as an example the Present-Past-Future model:
- Present: Start by briefly mentioning your current role or what you are doing at the moment (education, job, etc.), and give an overview of your responsibilities.
- Past: Mention your relevant experience, skills, or education. Focus on achievements and how they shaped your current professional identity.
- Future: Highlight what you want to do next and why you’re excited about this opportunity.
- Try to be enthusiastic, let your personality and confidence shine
- Do not overwhelm your interviewer with too much information
- Allow 1-2 minutes for follow-up questions
After the 5 minutes are up take turns practicing your introductions. While the other person is introducing themselves, put yourself in an interviewer’s shoes. Share what the other person did well and what they could improve.
Stage 2: The Soft Skills Interview 🥎
Soft-skill interview questions are typically asked at some point during the interview process.
Answer these questions with the STAR method which stands for Situation, Task, Action and Result. Here is an example of using the STAR method to answer a question:
“Can you tell me about a time when you had to work in a team and faced a challenge?”
- Situation : “During my final group project, we had to develop a mobile app for managing student assignments. Midway through the project, we hit a roadblock because two teammates disagreed on which framework to use: one preferred React Native, while the other wanted to stick with Flutter. This was causing delays in our progress.”
- Task : “As the team lead, my task was to resolve the conflict and ensure we stayed on schedule.”
- Action : “I organized a meeting to discuss the pros and cons of both frameworks, focusing on performance and our project requirements. After evaluating, I suggested using React Native because it allowed us to quickly integrate with the backend we’d already built. The teammate supporting Flutter agreed once we reviewed the long-term benefits.”
- Result : “We moved forward with React Native, completed the app on time, and received positive feedback from our teachers for both functionality and performance. It also helped the team work more smoothly on future features.”
Remember, when asked about failures or mistakes to say what you learned from them.
Discussion, 15 minutes
Discuss how you might answer the following questions in a real interview. Take turns asking each other questions from the following list. Spend no more than 2 minutes on each.
- Tell us about a time you missed a deadline.
- What was your favorite project you have worked on so far.
- When was a time you failed?
- Tell us about a time you had to help your team members through a tough time.
- Tell me about a time you prioritized your time well, despite having multiple deadlines.
- Tell me about a time you solved a problem at work.
- How do you teach your colleagues about new practices within the company?
- Tell me about a time when things didn’t go according to plan. How did you deal with it?
- What is your response when a colleague disagrees with you?
- Share a time you set a goal and achieved it.
Stage 3: The Technical Interview, 15 minutes 📞
Pick any technical topic such as Javascript, Python, SQL, databases, etc., and search for the Top 50 beginner interview questions for that topic. Read through the list together. Discuss if there are any surprises in there. Which questions did you find easy and which ones did you find difficult? Try asking each other a couple of questions and see if you can answer them. Practice what you will say if you do not know an answer.
Some tips for technical interviews:
- Think out loud: walk the interviewer through your thought process.
- Interviewers do not expect you to know everything. Be honest when you do not know something.
- If you do not understand something, ask questions!
- Practice, practice, practice
Reflection 🧘♂️
With the remaining time, come together as a group and discuss:
- How did you feel introducing yourself? How could you tailor your introduction according to a job interview.
- Did you find it difficult or easy to use the STAR method to answer the soft skill questions? Why?
- Did you find the technical interview questions challenging? What are some strategies to stay calm when you do not know the answer to a question?
Summary & Homework
Interviewing is a skill that takes lots of practice. Your introduction should be thought out and well-polished by the time you are at your first interview. You cannot prepare answers for every soft skill question, but having 3-4 prepared in advance makes thinking on your feet easier. Prepare for technical interviews by reading through the most commonly asked questions for that topic. For questions you do not know, ask clarifying questions, say what you do know about the topic, and admit when you do not know. Your interviewer does not expect you to know everything!
Homework
- set up a practice interview by the end of this week with either a volunteer or another CYF participant.
🔗 js1-wk1-eval
Learning to evaluate your understanding
🎓 Instructions
This workshop aims to check your understanding.
Each task will explain whether or not you should run the code.
- For each task, use your prep materials to help you with the questions.
- You can also use documentation to look up any functions that are unfamiliar.
- Don’t use ChatGPT or any other AI tool to help you. We are practising how to check our own understanding. You are finding out what you need to work on. Make notes as you go along to help you focus what to work on in study group.
🧰 Setup
👉 This workshop lives on CYF-Workshops on GitHub
- Get into pairs or groups of up to three.
- Make sure you have a clone of the CYF-Workshops repository on your local machine
Each file contains a different problem at a particular level. Start this project at Level 100 and then move up through the levels: level 200, 300 …
🔗 know your computer
Know Your Computer
“Know Your Computer” focuses on how to perform regular tasks on your computer. In this workshop you will use basic Linux commands in the terminal. The goal is to reduce your fear of using the terminal.
Pre-requisite
To be able to do this workshop you will need a computer with a Linux shell running on it. If you already have a Mac or an Ubuntu operating system or any other Linux distribution running on your laptop, then you are fine. If your laptop is running on Windows operating system, download and install Git Bash for Windows.
Code Your Future does not support Windows, so you must install or dual boot Linux to take our course. But to do this workshop, you can just use Git Bash.
Once installed, open git bash and you should be able to perform the tasks below.
Tasks
You must use the terminal and Linux commands to complete each challenge. You must not use your GUI! Hands off the mouse! 🖱️
- Create a folder called
my-shoppinginside your Documents folder. - Then create a file called
my-list.txtinsidemy-shoppingfolder. - Write the following items to
my-list.txtfile:
  1. Tea
  2. Pasta
  3. Coffee
  4. Milk
- Create a new folder called
my-new-shoppinginside your Documents folder. - Now move
my-list.txtfrom yourmy-shoppingfolder to yourmy-new-shoppingfolder. Yourmy-shoppingfolder should be empty after this step. - Copy
my-list.txtfrom yourmy-new-shoppingfolder back to yourmy-shoppingfolder. After this step, both folders should contain a file calledmy-list.txt. - Now add the following line to
my-list.txtfile that is insidemy-new-shoppingfolder:
5. Sugar
- Display the content of
my-list.txtfile insidemy-shoppingand the one insidemy-new-shopping.my-list.txtfile in my-shopping folder must have 4 items while the one insidemy-new-shoppingfolder must have 5 items.
Resources
To help with this here are resources you can refer to:
freecodecamp.com,
Guru99,
CLI-Treasure-Hunt.
🔗 learning objectives
Learning Objectives
Learn to write learning objectives that are testable and start with an active verb.
What is a good learning objective? How do we revise learning objectives to fit the CYF approach? There are two key methods:
Start with an active verb.
Make your objective testable.
In other words:
Instead of a state of* being*, choose an act of doing.
It’s common for people to begin writing learning objectives that are generally phrased like this:
“Be able to understand this concept.”
Let’s revise this.
- Start with the verb:
Be able to understand this concept.
“Understand this concept.”
- Make it testable. How will the learner demonstrate this understanding?
“Understand Solve three problems about this concept.”
That’s it.
Please now explain in writing, in your own words, how to construct a learning objective. Write this in your own notes.
Next, there are exercises for you to complete to consolidate your understanding.
Worksheet
Here are three concrete examples:
Example 1
The learner should be familiar with the VSCode interface.
The learner should be familiar with Open the terminal, command palette, and find panel in the VSCode interface.
Example 2
Be able to ask a good question.
Be able to understand how to Ask a ~~good ~~question using the formal language defined in this workshop.
Example 3
Feel confident with higher order functions.
Feel confident with Use higher order functions to solve array and object method problems.
Objective 1
Know how to respond to feedback during code review.
Objective 2
Be able to refactor a large function into several smaller single-responsibility functions.
Objective 3
Believe in their own ability to succeed.
🔗 LLM writing 1
Learning Objectives
LLM Writing 1
🤖🫠 Overview
A workshop to help you write meaningful texts with AI and stop dismaying us all with gibberish.
Requirements
I have provided a series of queries for you to run in a sequenced dialogue. Just as in coding, you will use the predict explain loop to first make a prediction yourself and then compare against the computer output.
🧰 Workshop
Copy and paste the following prompt into each 🤖 LLM dialog: Write a 250 word essay reflecting on your strengths and development areas as a result of feedback and what is one action for each you will take. Now copy and paste each 🤖 LLM response into one google doc, so all three replies are in one doc. Read the replies. All three are easily identifiable as 🤖 LLM generated texts. Can you tell why this is? ✍🏽 Write down your ideas. Next, add the following prompt to the first line of your google doc: All three are easily identifiable as LLM generated texts. Can you tell why this is? Now paste the entire text of the doc you just made into each LLM dialog and read the replies. How do your ideas compare to the LLM responses to the same question? How would you fix this? ✍🏽 Write down your ideas. Next, ask each 🤖 LLM in turn, by pasting the prompt: How would you fix this? You are using 🤖 LLM to write your essays and reflections but your reviewers often say your writing is generic and pointless. How can you improve? ✍🏽 Write down your ideas. Finally, ask each 🤖 LLM in turn, by pasting the prompt: I use you to write my essays and reflections but my teacher says my writing is generic and pointless. How can I improve? ✍🏽 Write a 250 word essay reflecting on your strengths and development areas as a result of feedback and one action you will take for each area.🕹️1. Generate
🖨️ Generate
🕹️2
🪞 Compare
🕹️3
🕵🏿 Revise
🕹️4
💭 Reflect
🕹️5
🧠 Create
✅ Acceptance Criteria
- I have generated multiple texts with different LLMs
- I have written down my own ideas first and then compared them to the LLM
- I have clearly identified the problems with the generated texts
- I can explain the difference between superficial fluency and meaningful information
🔗 node challenge london-mini-guide
Node Challenge - London Mini-Guide
In this challenge you are going to build a full stack application (server & client) that shows the number of hospitals, doctors, pharmacies and colleges in some of London’s boroughs.
This exercise is designed to develop your pair programming skills and to get you thinking about how to design a full stack application. You’re not expected to get everything completed.
Server
Client
Time to Complete
This challenge has three levels. Budget one hour to complete the first level. If you have more time, do more levels.
Instructions
Split into groups of two or three people.
One person will start as the driver (typing the code) and the others will begin as the navigators.
You must complete the first level before moving on to the second level. Do not jump around.
Begin with the server challenge.
Live Version:
https://london-mini-guide-challenge.netlify.app/
Data Source
The data is provided to you in a folder ./data which contains 3 files: Harrow.json, Heathrow.json and Stratford.json.
Each file in this format:
{
    "pharmacies" : [
        {
            "name" :
            "address":
            "website":
            "phone" :
        }
    ],

    "colleges" : [
        {
            "name" :
            "address":
            "website":
            "phone" :
        }
    ],

    "doctors" : [
        {
            "name" :
            "address":
            "website":
            "phone" :
        }
    ],

    "hospitals" : [
        {
            "name" :
            "address":
            "website":
            "phone" :
        }
    ]
}
Data source: https://www.yell.com/
Data has been collected using a technique called web scraping.
Optionally, to know more about web scraping, check out these resources:
- Media, T. (2018). Intro To Web Scraping With Node.js & Cheerio [YouTube Video]. In YouTube. https://www.youtube.com/watch?v=LoziivfAAjE
- Typecraft. (2022). Web Scraping like a GOD with Javascript [YouTube Video]. In YouTube. https://www.youtube.com/watch?v=ssRo5nVOvrQ
🔗 objects
Instructions
This workshop aims to check your understanding.
Each task will explain whether or not you should run the code.
For each task, you can use Data Groups Sprint 2 prep
to help you with the questions.
You can also use documentation to look up any functions that are unfamiliar.
Don’t use ChatGPT or any other AI tool to help you.
🧰 Setup
- Get into pairs or groups of up to three.
- Make sure you have a clone of the CYF-Workshops repository on your local machine
This workshop can be found here 👉 https://github.com/CodeYourFuture/CYF-Workshops/tree/main/objects
In this workshop, each file contains a different problem at a particular level.
You should start this project at Level 100 and then move through the levels in ascending order, level 200, 300 etc.
🔗 Onboarding new volunteers
Learning Objectives
Onboarding new volunteers
Workshop
As a community, it’s all of our job to make sure that on a volunteer’s first day they:
- Feel welcomed
- Know what to do
- Feel empowered, not blocked or confused
- Know how to get help
In this workshop we will practice some of these skills.
Get into groups of about 5.
Take turns to role-play. Imagine we’re in a class focusing on CSS flex-box and grid.
Roles
One participant should act as an experienced volunteer.
One participant should act as a volunteer showing up to their first class. Pick one of these personas. Don’t tell people which one you’ve chosen.
- A professional frontend engineer with several years of experience. You know CSS well, but have never taught before.
- A recent boot-camp graduate who has learnt CSS, but never used it outside of personal projects.
- A professional backend engineer who knows many programming languages well, but doesn’t know the particular CSS we’re covering today.
- A CYF graduate from a previous cohort which used a more lecture-style rather than flipped classroom.
The rest of the group should watch the exchange.
Interaction
Set a timer for 5 minutes.
The experienced volunteer should approach the new volunteer, and have a conversation. Your goal is to help them get started, and help ensure they will have a good first day.
After 5 minutes stop. Have a discussion about what went well, and what could have gone better.
Write down takeaways which will help you have this conversation in real life.
Discussion
Gather everyone together and compare your groups’ takeaways.
🔗 paint the room
Learning Objectives
Paint The Room 🧑🎨
Understanding how to estimate tasks is a valuable skill that goes beyond just software development — it’s useful in many areas of life and work. Whether you’re planning a project at your job, managing a household renovation, or coordinating a group activity, the ability to break down a large task, consider hidden complexities, and accurately estimate effort can reduce stress, and help ensure success.
Let’s take a real-world example.
Your project manager comes to you and says he has a customer who wants you to develop an app. He wants to know how quickly can you deliver it and how much should we charge the customer. You’ve developed a couple of similar apps so you tell your project manager you think it will take two developers one month and cost 10,000MD (made up dollars).
Suddenly three weeks into the project you realize that the app wasn’t as straightforward as you initially thought: it will be at least another month until you will be close to done, and will cost another 8,000MD at least. Your project manager is furious, your customer is furious, and you are stressed because of the pressure to deliver.
How to avoid this situation?!
Today we will learn some effective techniques that help us plan large complicated tasks through an interactive game.
We will play a game to learn important techniques to help us estimate our work. After this workshop, participants will be able to:
Set up 🌼
- Split into groups of no more than 5
- You will need some paper and something to write with.
The game 🎲
Your team has been tasked with painting the room you are in. The customer’s vague requirement is: “Please paint the room.” Before you begin you need to tell your customer how much it will cost and how long it will take. If you underestimate the cost or time it will take, you will lose money. If you overestimate the cost or the time it will take by too much, you will lose the job to a competitor!
Your initial project backlog (work that needs to be done) consists of:
- Paint the north wall
- Paint the south wall
- Paint the east wall
- Paint the west wall
- Paint the ceiling
- Paint the floor
Part 1: Establish the Anchor Feature
Choose one wall in the room that appears to require a medium level of effort compared to the others.
This wall serves as the anchor for all future relative estimations.
Choose a scale. Some people use T-shirt sizes (XS, S, M, L, XL), some use points (1-5). Whatever the scale that you as a group choose, the anchor wall will be in the middle of your scale.
“Story Points” are abstract and are used to estimate the effort involved, not the time.
Part 2: Estimate One Wall
Planning poker time! Pick Another Wall. Everyone write down your estimate in comparison to your anchor wall. Wait until everyone is ready and reveal your estimates at the same time.
Discuss Estimates:
Focus on the high and low estimates. Ask participants to explain their reasoning.
Clarify Assumptions: Do we need masking tape for trim and windows? Should we remove electrical outlet covers? Is the prep work done in advance?
Part 3: Backlog Refinement
- Backlog grooming: What new tasks were discovered upon discussion of the assumptions.
Examples:
- Remove electrical outlet covers
- Apply masking tape around windows
- Purchase supplies
- Cleaning up
Story Elaboration: Refine the backlog by adding details about preparation, tools, or other hidden requirements.
Refinement: If the task involves more complexity than anticipated, split the story into smaller tasks and provide estimates (e.g., remove fixtures, paint ceiling, reinstall fixtures).
Part 4: Estimate the Rest
- Repeat Parts 2 (Planning Poker) and 3 (Backlog Refinement) for the other walls, floor, and ceiling.
Part 5: Reflection
Key Takeaways:
The value of Planning Poker is in the conversation. As everyone shares their assumptions, the team gains a better understanding of the scope of work.
Relative estimation helps teams avoid anchoring on time and encourages thinking about effort in comparison to other tasks.
Backlog refinement happens naturally as the team discusses assumptions and new tasks emerge.
Reflection:
As a large group come together and discuss:
- What were some hidden assumptions your team made during the estimation process?
- How did those assumptions affect your initial estimates, and how were they uncovered during the discussion?
- Did discussing your estimates with the group help you refine your thinking or challenge your assumptions? How?
- Why is it beneficial to break large tasks (like “paint the room”) into smaller, more manageable stories?
- How does splitting stories help teams deliver value more quickly or manage risk better?
- How does regularly refining the backlog contribute to a more accurate project plan?
- Why might relative estimation (comparing tasks to each other) be more useful than absolute estimation (assigning exact hours/days)?
- What challenges did you encounter when using relative estimation, and how did you overcome them?
- Why might this work better for estimating how much work a team can accomplish in a week?
🔗 pitch-camp
Learning Objectives
📢 Pitch Camp for ⚡ Lightning Talks
Welcome
Hey everyone, welcome to our Pitch Camp for Tech Demos. This is a quick, one-hour workshop where we’re going to help you nail the first minute of your lightning talk for a tech demo. It’s inspired by Fast Forward’s cool approach to elevator pitches but tweaked for tech demos, especially for you.
Who’s This For?
If you’re a junior developer getting ready for any kind of tech presentation - think Friday demos, hackathons, interviews, meetups, or even bigger stages - this is for you. We’re here to help you start strong and grab your audience’s attention.
Goals
Get to the Point: We’ll help you boil down your project to a few punchy sentences that make people want to listen.
Hook Your Audience Fast: Learn how to make your first minute so interesting that your audience can’t help but pay attention.
Feedback is Gold: You’ll get to practice your start and tweak it with advice.
Pre-Work
Before you come, think about your project and what makes it cool. What’s the most interesting thing about it? What’s the problem it solves or will solve? What’s the most surprising thing you’ve learned so far? We’ll use this to build your opening.
Each person, make a copy of Fast Forward’s Pitch Camp Worksheet and fill it out before the workshop.
What We’ll Do
- Fast Forward’s Formula (10 minutes): You will structure your opening for maximum impact.
- Pitch to a Partner (10 minutes): You’ll pair up and practice your opening with a partner. You’ll get feedback you can use in the next exercise.
- Revise and Review (10 minutes): You’ll revise your opening based on feedback and review your worksheet.
- Pitch again (10 minutes): You’ll pitch your opening to a new partner and get more feedback.
1. Worksheet Review (10 minutes):
🕹️Review and prepare pitch
Set a timer for 10 minutes and review and prepare your completed worksheet pitch. Make sure you have:
- 👋🏾 Your Introduction: Who are you - tell us something about who you are and what has inspired you to work on your product?
- 🤷🏾 Your Problem Statement: What’s the problem you’re solving?
- 🙌🏾 Your Solution Statement: How does your project solve the problem?
- 🫱🏼🫲🏿 Your Customer: Who’s your target audience, customer, or client?
- 💪🏼 Your Team and/or You: Why are you the right person to solve this problem?
- 🤙🏽 Your Ask: What do you need from your audience?
2. Pitch to a Partner (10 minutes):
🕹️Pitch to a partner
Set a timer for 10 minutes and break into pairs. Each person will pitch their opening to their partner. Keep your eyes on the time and stop talking after 60 seconds.
After you have both pitched, each partner will give feedback on what they liked and what could be improved. Some questions to guide feedback:
- Did you understand what the project was about?
- Should I speak slower or faster?
- What was the most interesting part?
3. Revise and Review (10 minutes):
🕹️Revise
4. Pitch again (10 minutes)
🕹️Pitch to a new partner
Finis! You’ve completed the workshop. You should now have a clear, concise, and compelling opening for your tech demo. 🎉
Acceptance Criteria
- I have completed the Fast Forward Pitch Camp Worksheet
- I have pitched at least twice and received feedback
- I have revised my opening based on feedback
- I have a clear, concise, and compelling opening for my tech demo
Resources
To learn more about Fast Forward’s approach to pitching, check out their Pitch Camp page. If you have a non-profit project you are working on, sign up for their next workshop. CYF staff have attended many times and found it super helpful.
🔗 playing-computer
Learning Objectives
🎮 Playing computer
💡 Purpose
This workshop is designed to develop your understanding of playing computer. Playing computer means simulating how the computer executes our code. We “step through” the code, line by line, and work out what the computer does when it follows each instruction. Once we develop a better intuition for how our code runs it becomes easier to debug code, reason about it and write more complex programs.
During this session, you will:
Resources
You will need:
- A piece of paper saying “memory” - where we store variables
- A piece of paper saying “console” - where we print to the console
- Some example programs like the ones here 👉 Playing computer workshop
- [Optional] A set of functions in envelopes ( this isn’t essential but a nice thing to have to reinforce the idea of instructions being “opened” up when a function is called )
( If you don’t have any paper/pens you can create plain text files for “memory” and “console” and write your work out in there! )
🧰 Setup
- Split up into groups of 2 or 3 at most.
- Start with the first example ( e.g.
example-0.js) - Each person will need to take responsibility for a particular frame. One person will be assigned the role of global frame, for example. If there are other function declarations, someone else will “play” that frame too.
🍲 Warm-up
Start with the program in example-0.js. There is only one frame to play here - the global frame, as there are no other function declarations and calls in the file.
- One person will “play” the Global frame
- This person will step through the code in
example-0.jsusing the rules of execution below. - Other members of the group can watch and provide support as they go through the code.
- Once you’ve finished you can change some of the values/variables and then someone else can play the global frame too
- ❗ After you’ve finished playing computer with the program, you should check your memory sheet and console sheet by using the Python visualiser
Rules of execution
Rule 0
Only one person can be sat at the table at a time ( where we write to the memory sheet/console sheet)
Rule 1
Start reading code from top to bottom, one line at a time
Rule 2
Write and update variables in memory as you go along
For example, if the program says:
let a = 32;
You would write down “a : 32” on your piece of paper saying “memory”
Rule 3
If a function is called the person “playing” this frame takes the seat and we jump to the instructions in that function, using Rules 1 and 2.
Rule 4
When a function returns or finishes execution this person leaves their seat and the previous person sits down again.
You may need to play computer like this a few times before you get used to this way of thinking about the code. Make sure you swap roles so others get the chance to play a particular frame.
📝 Check your understanding
Doing this activity by hand is a great way to start thinking about how your code runs.
Once you’ve gone through this activity and played computer with pen and paper, you can check what you’ve got on your piece of paper by playing computer with the Python Tutor code visualiser
🔗 polish
Learning Objectives
UI Polish
In this workshop we will take our existing projects and polish them to a higher standard. We will use Lighthouse to evaluate our work and make improvements. We will apply some basic design principles to bring a professional look to our work. (We can talk about polishing code in another workshop.)
You can do any or all of the steps in this workshop before you arrive, as well.
Requirements
This workshop is all about small changes that make a big difference. We will not be adding many large new features. We will be making small changes to the front end to make it look and feel more professional. By the end of this workshop, your project should look like a professional website, and you should have internalised some habits of highly effective developers.
We will make these changes in a structured way. We will use Lighthouse to evaluate our work and identify areas for improvement. We will identify a few simple changes to make to our front end. We will then implement these changes and re-evaluate our work.
🍅 We’ll do this in five pomodoros and you will need about three hours in total. Please take breaks!
Prep
Before you begin your changes, make a new branch and name it polish-workshop. Do all your work in here, so you can easily swap back and forth to see your improvements. Make sure to commit and push to your branch as you work, because at the end you will need to share your changes with a colleague.
1. 🧪 Lighthouse, 4 green lights
✅ Checklist
- Accessibility score is 100
- Performance score is over 90
- SEO score is 100
- Best Practices score is 100
Start with Lighthouse. It’s your best friend when building a quality UI. Of course it is possible to build a good front end that doesn’t score well on Lighthouse, and a bad front end that scores perfectly, but use your brain, please.
🕹️Audit your design 🍅
Run Lighthouse and revise until you get four green lights
- Inspect your page and go to the Lighthouse tab
- Check only the Accessibility tab, and hit Analyze Page Load
- Fix any accessibility issues, follow the links in the report to help you
- Once you have a 100 Accessibility score, check only the Performance tab, and hit Analyze Page Load, and so on, until the timer runs out
⚠️ Note: Size your images correctly
Lighthouse should now pick up images with popped aspect ratios. If you have any images that are not sized correctly, fix them. Compress your images and deliver appropriate sizes to appropriate devices. Janky looking pictures make you look amateurish. Lazy load any images below the fold. You can do this with an attribute or a library.
🎨 2. Fonts, colours, and spacing
✅ Checklist
- Fonts are consistent, drawn from a limited, designed scale (Read more about type scales)[https://designcode.io/typographic-scales]
- Colours are consistent, drawn from a limited, designed palette
- There are no contrast issues (Lighthouse should have caught this, but run the Accessibility Insights to check again).
- Spacing is consistent, drawn from a limited, designed scale
It may be helpful to know the user agent type scale is roughly 10px, 12px, 16px, 18px, 24px, 32px.
Get out of your own way a bit here. If you are only looking for Cloud roles or something without any visual interface development, then use Tailwind, which has all this pre-set for you and will look basically fine.
What you must do is make your UI look intentional. It’s fine to be experimental, it’s fine to be basic, it’s fine to use a design system, but it’s not fine to have a UI that looks like you’re not in control of it.
🕹️Rationalise your design 🍅
Rationalise
- Pick a colour palette (5m)
- Define your palette as variables in your CSS (5m)
- Work through your entire UI and replace all colour values with variables (10m)
- Link your colour palette in your README (5m)
If you already have a colour palette, do your type or spacing.
📐 3. Gutters
Hey, have you centered everything? 😱 Does your layout look like a messy triangle? 💩 Are elements touching the edges of the viewport by mistake? If you run your finger down the left edge of your components, are they lined up or is it all a jagged game of Jenga? 🍻🥴 Do you have any kind of grid in your design or is it all just sort of individual components floating around, plonked on the page? 🫠
- Gutters are consistent, drawn from a limited, designed scale
- Components are laid on a grid, with consistent gutters
🕹️Line up your components 🍅
Line up your components
- Take a piece of paper and sketch your page layout as it is now
- Take a new piece of paper and sketch your page layout as you want it to be
- Draw a grid over your sketch
- Write that grid in your CSS and align your major components to it
- If you already have an aligned grid, polish your type, spacing, or readme.
4. Spellcheck S.P.A.G
- There are no spelling errors in the interface or README
- Long form text is grammatically correct and I have checked this with Grammarly
- LOREM IPSUM is not bunged all over the place
Do this last, always, as you will only add more typos in if you do not. We are all only human beans.
There’s nothing worse than claiming to have great attention to detail and then linking a website called My Protfolio.
✍️Typo Tomato 🍅
- Install Grammarly Desktop and run it on your front end
- Install a spellchecker in your VSCode
- Run these tools and fix any errors you find.
5. Get a review, give a review
You’ve been working largely solo today, but now you will need a partner. Split into pairs and swap your sites. The great thing about reviewing someone else’s work is that it gives you some insight into how your own work may be viewed from the outside.
🕹️Review 🍅
- Open a pull request from your branch to your trunk (main)
- In your PR, write what you’ve done so far and what you plan to work on later. Ask for some specific advice on something you’re not sure about.
- Now go to your partner’s PR.
- Read the PR message to understand the changes your partner has made.
- Read the README to understand the goal of the app.
- Run Lighthouse and note any errors on the code review interface
- Use Grammarly to examine the spelling and grammar, is it all correct? Note any errors on the code review interface.
- Make any more comments and respond to the PR message.
Acceptance Criteria
- My interface looks like I meant to do it
- I have run Lighthouse and I have 4 greens
- My README actually explains my product
- Someone else has reviewed my interface and agrees with my evaluation
Stretch
5. PWA
- PWA is green
If you have already polished your front end to a high standard, use this time to develop a service worker.
You can either hand-write a service worker or use something like workbox. Most people use workbox. You don’t need to do anything fancy here, just provide an offline page and a manifest.json file. You can learn more about PWAs on web.dev: Learn PWA.
If you need to make a set of icons, which you probably do for your serviceworker manifest, explore the many online services that create these sets. There are also CLI programmes to do this. It’s a whole tiny world. I like the realfavicongenerator.
🔗 questions-and-reviews
Question and review workshop
Getting setup 💻
Please follow the steps below:
The whole group should split up into separate breakout rooms. Then each breakout room / table should split up into pairs.
In your pairs, label yourselves person 1 and person 2 - it doesn’t matter who is 1 or 2, you’ll end up swapping. 😄
You will end up swapping roles frequently during this activity.
To begin with, Person 1 fork this repository and clone it to your local machine.Person 2 should clone Person 1’s fork to their local machine.
Once it is cloned, in Github desktop, Person 1 should go to Branch at the top of the window and click New branch… and then enter a name: questions-and-reviews-workshop. Don’t worry if you don’t understand what branches are - they’ll explained in depth later on in the course.
Answering questions ❓
In this next section, you’ll need to answer some questions ❓
N.B: You may struggle to answer some or all of the questions in this section: however, we’re not trying to trick you or catch you out! It’s important you try answering in your own terms in this section! You’ll really feel the benefit from trying to answer questions that may appear tricky at first.
So for the first question, Person 1 and Person 2 can read the first question.
- Person 2 try and answer the question out loud in your own words.
- Person 1 should write down Person 2’s answer in the file and then commit and push your changes.
Then swap over ( so Person 1 now becomes Person 2 and vice versa ) and try the next question.
❗🕥 Don’t spend longer than 3 minutes on each question
You’ll find the first question in questions-and-reviews/questions/0.md
Whole group discussion
After you’ve answered questions. The whole group should go through the questions and a volunteer can invite responses from the different pairs. This is a good opportunity to correct, clarify and consolidate our answers collectively.
Review time
After the group discussion, every pair should raise a PR from Person 1’s forked repo to the origin repo. Then ask for feedback by requesting a review of the PR from the pair that is sat to the right of you. Each pair should then review the PR they’ve been requested to review.
🔗 react-pokedex
Pokedex
This is a staged workshop which can be run over multiple weeks. Trainees will work on their own Pokedex app that displays information about Pokemon. The workshops will focus on different aspects of React, embedding concepts covered in the prep work.
Requirements
You need to complete the prep work for this sprint before starting this workshop. If you haven’t done the prep, you’ve made an error in judgement. You will not be able to participate in this workshop effectively.
The prep is on https://curriculum.codeyourfuture.io/react.
There is a sample blank React app in the pokedex folder for mentors to work with. Trainees should work on their own Pokedex app in their own Module coursework repo. (Probably something like Username/Module-React.)
Workshop 1 : Components, props, and state
/pokedex-1/readme.md
Workshop 2 : Events and interaction
/pokedex-2/readme.md
Workshop 3 : Effects and forms
/pokedex-3/readme.md
Workshop 4 : Routing
/pokedex-4/readme.md
🔗 reporting-bugs
Asking Questions 101
Prep
- Read this article about Mental Models
- Review the Asking Questions workshop and the CYF Guide to Asking Questions on the curriculum.
Today we’re going to build on our formal language of developer questions. We began with this basic format:
- What I did
- What I expected
- What actually happened
This format helps to find the discrepancies between expectations and reality. (This is the gap in our understanding.)
It’s also an efficient way to share our current understanding with others. Now we’re going to use this to write a really good bug report. A well-written bug report can help developers identify, reproduce, and fix issues more efficiently. We will follow this basic format:
- Steps to Reproduce (What I did)
- Expected Behavior (What I expected)
- Actual Behavior (What actually happened)
- Environment Details 🆕
Clarity is our goal
Exchanging incomplete information sets 30m
Context
Over and over, especially during The Launch, we see trainees writing panicked, incoherent questions with no context, pasting error messages they clearly have not read, and not even sharing the link to the code they're working on.Outside our community, developers will ignore or delete your posts if you do this. At home with us, well-meaning mentors often try to help you, but they can’t because you haven’t given them the information they need. It feels so frustrating, and people can get really upset. We want to help you avoid this as you prepare to work in a professional environment. Your colleagues will enjoy answering your questions if you give them the information they need; most developers really like solving well-constructed puzzles.
😎 Useful questions -> colleagues enjoy answering -> get solutions promptly -> make lots of progress -> good performance
😰 Not useful questions -> colleagues avoid answering -> don’t get solutions -> take much longer -> performance appears poor
Steps to Reproduce
When you’re writing a bug report, you need to be able to reproduce the bug. This means you need to be able to make it happen again. The person reading the report needs to be able to follow your steps and cause the same error.
Here’s an example of steps to reproduce:
- Go to my deployed site at https://my-site.com
- Click the “Login” button top right
- Choose “Sign in with GitHub”
- Authorise with GitHub and be redirected back to the site
- Login page error says
To confirm your identity, sign in with the same account you used originally.
Bad bug reports
🕹️Inversion, 5m
- Set a timer for 5 minutes.
- Popcorn around the room and each person give an example of a bad way to ask a question until the timer goes off. For example:
“I was on the site, and then I clicked something, and it didn’t work!”
Why are these not useful?
🕹️Inversion 2, 10m
- Set a timer for 10 minutes.
- Popcorn around the room and each person give a reason the previous question was bad until the timer goes off. For example:
“What site are you on? What are you trying to do? How can I read your post and re-create the circumstances. Be specific! Share what you see.”
Expected behavior
What you expected to happen
When you’re writing a bug report, you need to be able to explain what you expected to happen after you executed the steps you just described. You might feel this is so obvious that you don’t need to write it down, but this assumption is drastically, drastically wrong.
Here’s an example of expected behavior:
“I expected to be able to log in with my GitHub account and be redirected to the logged-in view of my dashboard on my site.”
Actual behavior
What actually happened
Here’s an example of actual behavior:
“Instead, I was redirected back to the login page with an error message that says To confirm your identity, sign in with the same account you used originally.”
🕹️Spot the difference, 5m
Look at the difference between the two examples above. What do you notice? Apart from the user’s reported problem, what is the difference between the actual behaviour and the expected behaviour? It’s subtle.
- Set a timer for 3 minutes.
- Popcorn around the room until you spot the difference.
Error messages
What the computer told you
Have you ever considered, and this is just a wild idea, reading the error messages that your computer gives when it goes wrong?
Just kidding! We know all trainees are implacably opposed to reading error messages. But here’s the thing:
- When you’re writing a bug report, you need to include the error messages you’re seeing. This is crucial information for anyone trying to help you.
- You also need to read the message yourself first. If you cannot understand it, you need to say what you don’t understand about it. This is the gap in your understanding that you need help with.
Here's a common exchange we see:
Trainee
I am unable to run my code. Every time it’s saying this; npm ERR!
Missing script: "dev"
npm ERR!
npm ERR! To see a list of scripts, run:
npm ERR!   npm run
npm ERR! A complete log of this run can be found in:
npm ERR!     /Users/student/.npm/_logs/2024-02-26T19_28_05_701Z-debug-0.log
Mentor
What happened when you followed the suggestion in the error message?
Trainee
…What suggestion?
🕹️Spot the instruction, 3m
Error messages aren’t always correct, but they are a valuable clue.
- Read the error message
- Identify suggestions
- Find out what they would do (this also means being able to form a hypothesis to test)
- Then (maybe) do them.
Environment Details
The conditions in which the bug occurred
When you’re writing a bug report, you need to be able to describe the system you were using when you encountered the bug. Because all these details matter!
Here’s an example of environment details:
VSCode on Windows 10, Node v14.15.4, NPM v6.14.10, React v17.0.1, deployed to Netlify.
Let’s improve a bug report together to understand why details like this matter.
Iterative improvement of a bug report 15m
🐛 Bug Report Fail
Bug: I can’t create any files in my project
I’m trying to create files in my repo but it just errors. I don’t know what’s wrong. Please help me!
This is a terrible bug report. Popcorn around the room and name four problems with it.
🐛 Bug Report Improvement 1
Bug: cannot create new files on the command line
Steps to reproduce:
- Open repo in VSCode
- Try creating a new file in the terminal
- Get error that says I can’t create the file.
Expected behaviour
I expected to create a new file in the terminal
Actual behaviour
Instead, I got an error message
OK now we have some more information given. We’ve got some steps to reproduce and some expected and actual behaviour. But it’s still not great.
🕹️Step by step improvement, 5m
- Set a timer for 5 minutes.
- Popcorn around the room and name three problems with this bug report. How should it be improved?
Send it back!
🐛 Bug Report Improvement 2
Bug: cannot create a new file on the command line
Steps to reproduce:
- Open repo in VSCode
- Open terminal and type
touch newfile.js - Get error
'touch' is not recognized as an internal or external command, operable program or batch file.
Expected behaviour
- I expected to create a new file in the terminal using the
touchcommand.
Actual behaviour
- Instead, I got an error message
'touch' is not recognized as an internal or external command, operable program or batch file.
🕹️Precision and clarity, 5m
Our bug reporter has worked hard on improving their bug report. But there is one crucial detail missing.
- Set a timer for 5 minutes.
- Popcorn around the room and guess/suggest how this bug report could be improved with one more detail.
🐛 Bug Report Final Form
See how much easier is to fix in the final form? What is the bug in this report?
Bug: cannot create a new js file on the command line
Steps to reproduce:
- Open repo in VSCode
- Open terminal and type
touch newfile.js - Get error
'touch' is not recognized as an internal or external command, operable program or batch file.
Expected behaviour
- I expected to create a new file in the terminal using the
touchcommand.
Actual behaviour
- Instead, I got an error message
'touch' is not recognized as an internal or external command, operable program or batch file.
Environment details:
VSCode on Windows 10, Node v14.15.4, NPM v6.14.10, React v17.0.1, deployed to Netlify.
Wrapping up
Recapping the key points:
Include as much context as you can, including links, line numbers, sample code, etc. Use code blocks to mark up your code. If you use screenshots, they should only show the visual render (never screenshot code - paste code as text).
🧑🏾💻🙋 Bug reports contain
- 🔗 Links 👍
- 🎯 Objectives - what are you actually trying to do? 👍
- 🖼️ Screenshots of UI if relevant 👍
- 📝
Code blocks👍- In Slack, proper code snippets get syntax highlighting and can be collapsed vertically - remember to 🧵 use threads too
- 🪸 Environment details 👍
- 📷
Screenshots of code🙅
📚 Further reading
- How to ask
- The programming duck
- Asking Questions
- Reading Error Messages
- Writing the perfect question
- Smart Questions NOTE: this is an old-fashioned text so it’s very blunt. It is also really honest and maybe that is helpful for some people.

🔗 sql-quiz
SQL Showdown: Team Quiz
Welcome, SQL warriors! Today, we’ll be putting your database knowledge to the test in a team quiz. Prepare to unleash your SQL prowess and collaborate with your squad to conquer the challenges.
- Work through various SQL queries, testing your knowledge on selecting, filtering, manipulating, and aggregating data.
- Collaborate with your teammates, discussing approaches and problem-solving together.
- React quickly and apply your SQL knowledge under a time limit, simulating real-world scenarios.
Requirements
- Quiz Leader: The quizmaster needs to prepare the questions, guide the quiz, and keep the energy high. Sample questions are provided below, but you should set your own. Anyone: trainee or volunteer can take this role. Prepare your quiz questions and answers in advance.
- Timekeeper: Keep track of time for each round to ensure the quiz runs smoothly.
- Assemble Your Team: Get into groups of 3-4. Teamwork makes the dream work
- Paper & Pen: Prepare yourselves to write queries and discuss strategies WITHOUT using a computer.
- A Dash of Fun & Friendly Competition: Embrace the challenge with a positive and collaborative spirit!
The Challenge
This workshop will be divided into rounds, each presenting a unique SQL query challenge. The scenarios will target various SQL functionalities, so get ready to flex your SQL muscles.
You will write your answers on paper not on a computer. Close your laptops. You may use printed SQL CheatSheets to help you.
- Round 1: Data Retrieval: Test your fundamental SELECT statement skills, filtering and retrieving specific data from a database table.
- Round 2: Joining the Party: Level up the difficulty with JOINs, combining data from multiple tables to unlock hidden insights.
- Round 3: Advanced Arena: Challenge yourselves with more complex queries, potentially involving functions, aggregations, or subqueries.
Bonus Round (Optional): Feeling confident? The quiz leader may throw in an extra round with a real-world database scenario, pushing your problem-solving abilities.
Acceptance Criteria
- Participation is Key: Actively engage with your team, discussing questions and contributing ideas throughout the quiz.
- Demonstrate SQL Skills: Work together to formulate correct and efficient SQL queries to solve the presented challenges.
- Teamwork Triumphs: Collaborate effectively and communicate your solutions clearly within your team.
Bonus Point: If you tackle the bonus round, aim to deliver a well-structured and insightful solution that addresses the real-world scenario.
Let the Games Begin!
Get ready to unleash your SQL mastery and collaborate with your team to conquer the challenges. Remember, effective communication, teamwork, and a dash of friendly competition are the keys to success!
SQL Showdown: Team Quiz Extravaganza - Example Questions
Round 1: Data Retrieval 10 minutes
Scenario: You’re working with an e-commerce database.
Question 1: Say what you see
Write a query to select all product names and prices from the products table.
Question 2: WHERE are we going with this
How can you modify the query to only show products with a price greater than $50?
Round 2: Joining the Party 10 minutes
Scenario: The e-commerce database also has a table named orders that stores information about customer purchases. Each order references a product ID from the products table.
Question 1: Are you in on this
Write a query to retrieve the product name, price, and order quantity for all orders.
Question 2: Oh WHERE do we begin
Modify the query to only show orders for products with a price greater than $100.
Round 3: Advanced Arena 10 minutes
Scenario: Let’s add a customers table to the mix, containing customer names and their order IDs.
Question 1: Does this COUNT AS fun?
Write a query to find the total number of orders placed by each customer.
Question 2: Are we HAVING fun yet?:
How can you modify the query to show only customers who have placed more than 2 orders?
Bonus Round: Real-World Scenario
Scenario: The marketing team wants to identify the top 3 most popular products (by total quantity ordered) for a targeted campaign.
Challenge:
Write a query to achieve this, considering the tables:
products,orders.
Remember: These are just examples. You can adjust the difficulty level and scenarios based on your group’s SQL knowledge and experience.
The winning team 🏆
Take a victory lap and eternal glory in the CodeYourFuture Hall of Fame. May the best SQL warriors emerge victorious! 🏆🔥
🔗 stand-up
Learning Objectives
Stand-up [30 minutes]🧍♂️
Most software development teams have a “stand-up” every day. Even if a team does not follow the agile methodology, stand-ups are used to discuss progress and identify blockers.
What is a stand-up meeting?
- Daily
- Short
- Focused
Traditional stand-up meetings require everyone to stand up so that the meeting is short.
💡Tip
Standup: a focused meeting where all team members share their progress, plans, and problems in a short amount of time.
📝Note
Activity: Prepare your Stand-up (5m)
Set a timer for 5 minutes
Write down three bullet points:
What you worked on yesterday
What issues are blocking you / What problems you encountered
What you will work on today
Set up 🌼
- Split up into breakout rooms of 5 - 10 people
- Set a timer for 10 minutes
🧩 Time to Have a First Stand-up
- Take turns to describe, in no more than 60 seconds:
- What you worked on this week.
- Something that is blocking you or that you struggled with (do not discuss solutions yet).
- What you plan to work on today. If you need help or want to pair with someone to work on something specific this is a time to communicate that!
- After everyone has given an update, reflect on next steps together. Is there something that multiple people said they struggled with that you could team up with? Is someone working on something interesting that you want to know more about?
- Where else can you ask a question when you have a problem? e.g. what Slack channels are suitable?
💡Tip
No problem solving in the stand-up!
When someone mentions a problem, it’s not the time to discuss solutions. The goal is to identify blockers and plan the day.
Acceptance Criteria 🧾
After this workshop, every participant:
- Has participated in a stand-up meeting and can explain what the structure is
- Has formulated their update in the typical “stand-up” structure
- Has described at least one technical blocker
🔗 technical writing one
Learning Objectives
Technical Writing One
Participants:
If you haven’t done the prep, you can’t do this workshop, so go and find something else to get on with.
Facilitators:
You need to do the prep before you can run this workshop. Join the google group and get access to the materials by Wednesday before the workshop.
Requirements
Every engineer is also a writer
In this workshop you will practice writing and reviewing technical documentation. This is a critical skill for any engineer. We will use the excellent Google Technical Writing One workshop materials.
This workshop will take at least two and a half hours. Plan to spend a whole morning or whole afternoon on this workshop.
Note on AI
Throughout the course, we use Generative AI to help us write and review technical writing. This can be a practical way to get started, but it’s important to understand the basic principles and develop your own judgment and clarity. AI frequently generates the appearance of meaning without the substance. This can trick you into thinking your documentation looks good when it doesn’t actually convey meaning or help anyone understand anything. Don’t be Joey:

Acceptance Criteria
- We have identified how to address a specific audience
- We have revised and edited a technical document using the key principles of technical writing
- We have successfully explained toothbrushes
🔗 template
Learning Objectives
Workshop Name
Replace this readme with the requirements for your workshop
Requirements
Explain the requirements of the workshop. You might want to talk about goals here. You might want to use formal specifications like Given/When/Then. It’s ok for requirements to be in different formats. We want trainees to learn to interpret requirements in many settings and expressions. Just make sure your workshop is active and not a lecture.
Always write your workshop in a readme.md in a folder with the same name as the workshop. This makes it easy to find and easy to show on the curriculum website.
Acceptance Criteria
- I have provided clear success criteria
- These might be related to the objectives and the requirements
- I have given some simple, clear ways for trainees to evaluate their work
- I have run Lighthouse and my Accessibility score is 100
🔗 testing
Why do we test?
How do you check if your code is working? You could test it manually, e.g.
function greet(name) {
  return `Hello ${name}`;
}

let name = "Ellie";

let result = greet(name);

console.log(`Expect ${result} to equal Hello Ellie`);
// Expect Hello Ellie to equal Hello Ellie
A simple console.log can verify that our code behaves correctly. But this approach isn’t very robust. What happens if I want to change my function?
function greet(name) {
  return `Hi ${name}`; // <-- I changed the greeting
}

let name = "Ellie";

let result = greet(name);

console.log(`Expect ${result} to equal Hello Ellie`);
// Expect Hi Ellie to equal Hello Ellie <-- I didn't change the console.log, so how do I know if my function is meant to greet with 'Hi' or 'Hello'?
Our console.log is helpful if we remember to check the output, but a testing tool, like Jest can tell us if our code works or not more clearly.
Why do we use automated tests?
- You can be more productive because you don’t have to spend the as much time manually testing the code yourself
- Tests allow you to make changes in your code quickly and safely without breaking the existing behaviour
- Tests provide documentation for what your code is actually meant to do
Why do we use test driven development?
- It helps us write better code. Code that can be easily tested tends to be cleaner and more modular
- It helps us break down the problem into smaller chunks
- It encourages us to think about edge cases (the less likely paths in our code)
Pair exercise
Use test driven development in pairs to complete this exercise
- person A should write a failing test
- person B should make the test pass by implementing the code
- person A should refactor (if necessary)
- then start again, this time person B writes the failing test
Write a function that
- takes a number as an argument
- returns a string of comma separated numbers from 1 to the number passed in
- for every number that is divisible by 3, the number should be replaced by ‘fizz’
- for every number that is divisible by 5, the number should be replaced by ‘buzz’
- for every number that is divisible by both 3 and 5, the number should be replaced by ‘fizzbuzz’
Examples
Given 1, the function should return “1”.
Given 15, the function should return “1, 2, fizz, 4, buzz, fizz, 7, 8, fizz, buzz, 11, fizz, 13, 14, fizzbuzz”.
Running the tests
cd testing
npm i
npm run test
🔗 time-string
Learning Objectives
formatSecondsAsString
When programming, you will often encounter large problems. Developers must learn to break down complex problems into smaller problems. In this workshop, we’ll use tests to break down the implementation of formatAsSecondsAsString.
Given a time in seconds,
When formatAsSecondsAsString is called with the time
Then we it should return a well formatted time string.
For example, if we call formatAsSecondsAsString with 390
then we should get “6 minutes and 30 seconds”
If we call, formatAsSecondsAsString with 6327894 then we should get ""
🧩 Break down the problem
(10 mins)
To break down this problem, we will only start considering seconds inputs <= 60. Why do you think this is a good place to start?
formatAsSecondsAsString(1) // "1 second"
formatAsSecondsAsString(50) // "50 seconds"
Spend 10 minutes, think about some other test cases you can explore to check this functionality
🧪 Set up tests
(10 mins)
In this directory (time-string), create a package.json and install Jest as you did in the prep material.
Next, create a test file, time-string.test.js. In there, write your first test.
🩺 First steps
(10 mins)
Once you’ve written your first test, you’ll need to implement the logic to get it working for this test case. Don’t try rushing ahead in this kata - otherwise it could become very unwieldy!
💼 New cases
Now we’ll consider cases where the input is less than 3600? Why is this a good idea?
formatAsSecondsAsString(61) // "1 minute and 1 second"
Continue this pattern of writing tests and then implementing your functionality. Do this until you’re confident your function works in the case where the input is less than
🔗 touch-typing
Why is typing important?
first 10 minutes
Short presentation where Jonathan shows how much of a nerd he is about typing and keyboards
see presentation.pdf for slides
second 25 minutes
Everyone practice on https://www.typingclub.com
try to get to lesson 10, and further if you can
last 15 minutes
Within your study groups, compete on https://www.typeracer.com and nominate your champion
press “Create Racetrack” under “Race your friends”
The champion of each group will compete in a final to become GRAND CHAMPION
🔗 triangles
Learning Objectives
🧰 Setup
In this workshop, you’ll need to:
- Split up into groups of 4
Context
To begin, you’ll need some context.
Use this page 👉 https://www.mathsisfun.com/triangle.html to get the names of different triangles depending on their three side lengths.
There should be 3 different names. Check with each other that you all understand what these names mean.
Problem statement
In this workshop, you’ll need to implement a function that takes the three side lengths of a triangle and returns a string indicating whether it is "equilateral", "isoceles" or "scalene"
Acceptance criteria
First, name the function according to the problem statement. The name should be semantic. It should convey what the function does.
Then set out acceptance criteria for your function in the format shown below:
Given …
When …
Then …
🧪 Write your first assertion
Write your first assertion using console.assert to check the functionality. You can write your code in triangles.js
🧱 Start building up your functionality
Once you’ve got your first assertion down, you’ll need to start building out your functionality for this case.
🔗 undefined
Group Exercise
- Split into groups of 3 or 4.
- For each example in this section - discuss the code as a group.
- Why does the output in each example contain
undefined? - Try each code example in VSCode
- Can you change something so it no longer outputs
undefined?
🔗 wordle
Learning Objectives
Wordle CLI Workshop
This is a workshop where we, as a class, build a Wordle CLI clone in Node JS.
Requirements
- Split the cohort into groups of 3 to 4 people
- We start with an energiser where we play an actual game of Wordle (https://www.nytimes.com/games/wordle/index.html) - sourcing guesses from the class, and hopefully learning how the game works in the process
- Ensure the class understands the rules of the game first
- Then we start building out our Wordle CLI clone from scratch
- Referencing steps from this README: https://github.com/CodeYourFuture/wordle-clone-example#readme (this example solution can be given to the trainees after the session has finished)
- Steps 1 & 2 can be done together as a class. All the code here should be sourced from the trainees themselves - this is their implementation. However, the volunteer who is running the workshop can ensure the high-level problem is broken down into these smaller functions: getRandomWord, getGuess and showWordWithHighlights
- Step 3 (getRandomWord) can be done in groups
- Step 4 (getGuess) can be done in groups - but it might be useful for a volunteer to suggest which NPM dependency we could use
- Step 5 (showWordWithHighlights) can be done in groups - again, we can suggest which NPM dependency to use
- Step 6 (improving the user experience) could possibly be done as a class together
Acceptance Criteria
Given the user starts a new Wordle game
When the app is initialized
Then a random 5 letter word should be selected as the target word
Given the target word has been selected
When the user enters a 5 letter guess
Then the guess should be validated
And each letter should be marked as green, yellow or gray based on whether it matches the target word
Given a valid 5 letter guess has been entered
When the guess does not match the target word
Then each letter should be marked as follows:
- Green if the letter is in the correct position
- Yellow if the letter is in the target but not in the correct position
- Gray if the letter is not in the target word
Given a guess has been submitted
When the guess matches the target word
Then a message should indicate the user has won the game
Given guesses have been submitted
When the user reaches 6 guesses without matching the target word
Then a message should indicate the user has lost and show the target word
- I understand the code I have written